
ChatGPT mirror selfie prompts need more than an outfit and a tidy room. The phone, hand, mirror and reflected background have to describe the same photograph. A convincing face can distract you from a second phone, a missing doorway or a grip that could not hold the device.
Start with an authorized adult mirror reference and change one part of the scene at a time. This guide uses a reflection map and a small inspection sequence so you can judge the result before saving it as a profile or social image. It is a workflow for a reflected portrait, not a collection of unrelated poses.
Begin with a real mirror reference
Choose a source where the mirror frame, phone and at least part of the hand are visible. Include enough room around the person to understand where the reflected background belongs. A heavily cropped face photograph gives an image model very little evidence about the original pose or reflection.
Use a reference you are comfortable editing and sharing. Keep the adult's real features, skin tone, body proportions and visible identifying details in the brief. Do not ask an image to become “more realistic” by changing the person's build or adding artificial skin texture everywhere.
If the source already has a difficult grip or a phone covering most of the face, take another photograph when possible. Revealing a hidden eye or inventing a new hand position is a different task from adjusting the background. Decide whether you actually need that change before adding it to the request.
Draw a reflection map before writing the prompt
Mark the mirror boundary, the person, the phone and two background anchors. A doorway and a window are useful anchors because their position and light can be checked across the output. The map does not have to be an accurate architectural drawing; it simply records the parts that must agree.
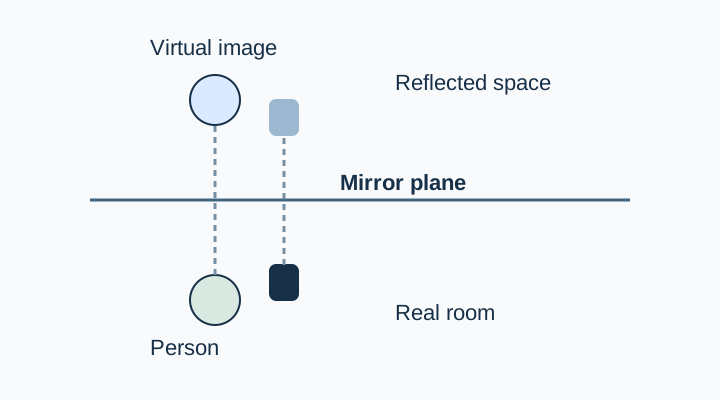
A mirror does not create an independently posed second subject. If both the person and reflection are visible, their head angle, arms and clothing need to remain consistent with the scene. If only the reflection is visible, the phone still needs a believable grip and the room still needs a coherent arrangement.
For a plain single mirror, keep the first test simple. Avoid multiple mirrors, reflective doors and shiny wall panels until the basic image works. Several reflections make it harder to identify which part changed.
State what changes and what stays
Choose one target: simplify the room, change the shirt, adjust exposure or make a different crop. Keep the remaining decisions fixed. A request that changes the pose, wardrobe, room and camera position makes a failed reflection much harder to diagnose.
Edit the attached authorized adult mirror selfie. Keep the person's recognizable face, skin tone, body proportions, hairstyle, pose, phone and visible hand placement consistent with the source. Simplify only the reflected room into a quiet apartment with the existing doorway and window in the same relative positions. Preserve the mirror boundary and the single phone. Use natural daylight matching the source. Do not create another person, another device, extra fingers or a different reflection. Keep the outfit unchanged for this test.Read the output as a photograph rather than a prompt demonstration. Asking for one phone does not prove the model produced one. Check the device's edges, cameras and the area behind the fingers at a useful zoom level.
If the image is otherwise good but changes a room anchor, return to the source and revise only that area where your editing tool supports it. The background-blur halo guide covers a different local problem: visible separation artifacts around hair and glasses.
Inspect the phone and hand together
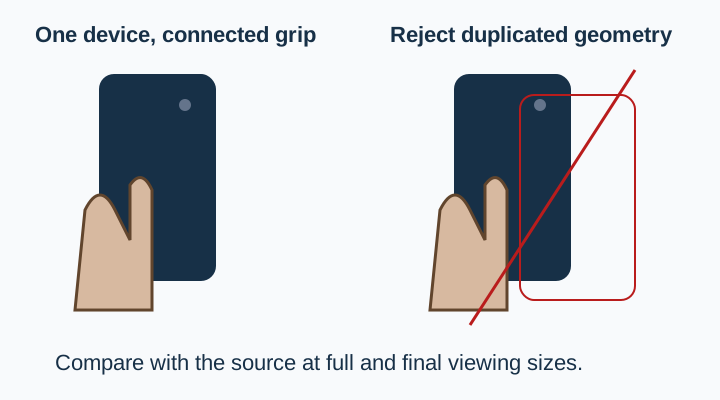
Count the visible fingers and follow the thumb into the grip. Some fingers may naturally be hidden; the issue is whether the visible parts connect plausibly. Do not reject a normal hidden finger simply because every digit is not displayed.
Check that the phone remains one rigid object. A curved case edge, a duplicated camera cluster or a device that passes through the palm can be easier to notice at the final viewing size than in a large detailed preview. Look at both.
Use the reference to settle ambiguous details. If a tattoo or ring appears on the opposite visible hand, compare the actual source rather than applying a generic rule about left and right. Mirrors reverse the view along the direction perpendicular to their surface; casual descriptions of “flipping hands” can create confusion when the phone software also mirrors a preview.
Follow the light through the room
Identify the main source in the reference: a window, ceiling fixture or visible lamp. Look at the brighter side of the face, the highlights on the phone and any nearby shadow. They should support the same lighting story.
A room edit can accidentally move the window while leaving the original face lighting in place. Ask for the background to respect the existing source, or choose a deliberately different lighting edit as a separate experiment. Avoid combining those decisions without checking the result.
Reflections do not need to show every room object. Objects can be out of view or obscured. Your review question is whether the visible scene is plausible, not whether the image contains every item named in a room inventory.
Preserve the person before polishing the scene
Compare the face at a similar scale to the reference. Check distinctive features, apparent age, hairstyle and natural skin tone. Then review body proportions and clothing fit. A nicer room is not a reason to approve a changed identity.
If you need a more formal portrait without a visible phone, use a suitable portrait source and the realistic portrait workflow. Removing the phone from a mirror selfie can require reconstructing areas that were never visible. A fresh source is often the simpler way to obtain an honest likeness.
Save the original and the accepted edit with different filenames. Keep a note of the exact requested change so a later version does not accidentally become your new identity reference.
Review the social crop separately
Make the intended profile or vertical crop after approving the scene. Check whether the crop cuts through the mirror frame in an awkward way or hides the hand information that made the grip understandable. A technically plausible full image can become confusing when only a small part is shown.
Download the reflection worksheet and use its source, phone, hand, room and identity checks in that order. For a broader social set, the Instagram content prompt guide helps assign different jobs to different images instead of repeating the same mirror photograph.
Try one controlled edit in QuestStudio
Open Image Lab with the authorized source and the narrow brief. Review the result before changing the outfit or adding another scene. Keep the accepted version only when the person and the reflection still make sense together.
A believable mirror selfie usually improves through a small, clear change. The most useful prompt is the one that makes the acceptance decision easy to explain.
Download the reflection review worksheet and replace its fictional example entries with your own approved sources.
Frequently asked questions
Can I start from a normal portrait instead of a mirror selfie?
You can explore a new concept, but the model must invent the phone, grip and reflection geometry. A clear mirror source gives you more evidence to preserve and review.
Does every finger need to be visible?
No. A natural grip hides some fingers. Check whether the visible parts connect plausibly and agree with the reference.
Why does the doorway change when I edit the room?
The model may reinterpret the whole scene. Name a few fixed room anchors and make a smaller edit, then compare the visible result against them.
Can I remove the phone and reveal my face?
That can require inventing hidden facial areas. For a likeness-sensitive portrait, use a clear unobstructed source instead.
Should I fix the outfit and the room together?
Begin with one change so a failure is easier to identify. Add the next change only after the first output passes its reflection and identity checks.