

To record a PowerPoint presentation with audio, open the deck in desktop PowerPoint, select Record, check the microphone, and record one slide before attempting the whole presentation. Save the editable deck and export a video using the recorded narrations and timings. Review the video as a viewer would, from the first word to the final slide.
The exercise below uses three slides and a 26-second timing plan. You can make the practice deck with simple shapes and type. The actual runtime comes from your recording and slide behavior.
Choose what the viewer should receive
Keep two outputs when the project will be revised. The PowerPoint file is your editable master. It keeps the slides and their recorded content available for later changes. A video is a convenient delivery copy when viewers need a fixed sequence with audio and timing already applied. The two files serve different playback experiences.
If viewers need to click links or move through the deck at their own pace, hand over the deck and give them a short playback note. If the recipient needs a straightforward narrated watch-through, make a video. You can share both files with names that tell the viewer which to open first.
Make the recording easy to repair
Create three slides titled Start, Compare, and Decide. Put a single image on the first, two large shapes on the second, and a short decision on the third. Write one sentence per slide in speaker notes. This is small enough that you can record it twice and compare the results without losing an afternoon.
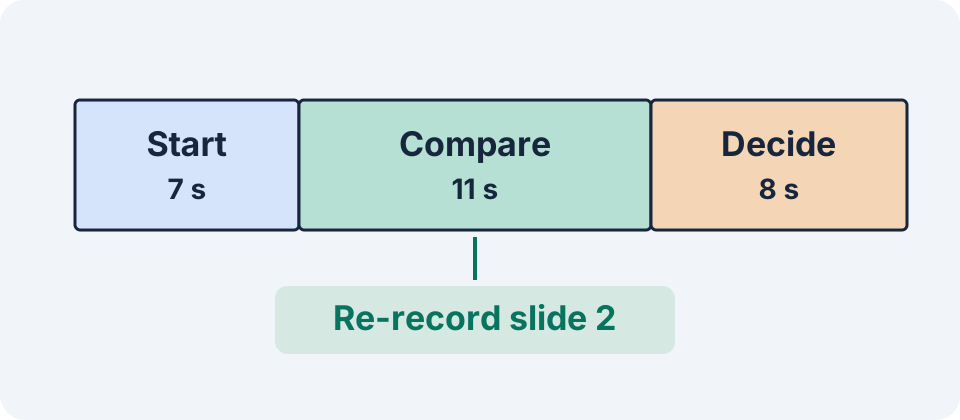
Plan seven seconds for Start, eleven for Compare, and eight for Decide. Treat the numbers as edit targets. Try the first sentence aloud before recording. If you need longer to explain the visual, move time into the right slide. The goal is to leave enough time for someone who is seeing the slide for the first time.
Record one slide and listen before you continue
In recent desktop versions of PowerPoint, use the Record control near the upper-right corner or the recording controls on the ribbon. Start from the beginning or the current slide. Check the selected microphone in the recording view and decide whether to include your camera. Make a short take with the same room, distance, and voice you will use in the final presentation. Microsoft’s recording guide.
Play the take through headphones or ordinary speakers at a comfortable volume. Listen for a clear first consonant, a stable level, and a quiet enough room between sentences. If speech sounds hollow, move a little closer and test again. If the wrong microphone is active, fix that first. A clean ten-second sample gives you a better basis for a full recording than a moving meter alone.
Record the rest in manageable sections. Allow slide transitions to finish before starting the next sentence. As you advance, pause where the viewer needs to see an animation or compare two items. Speak naturally and keep the cursor still unless pointing is part of the explanation. Rehearse a slide with builds so that the object appears when you name it.
Replace one slide and check its neighbors
Suppose slide two says “left” when the approved highlight is on the right. Save a copy of the deck, select the second slide, and start recording from the current slide. Record the complete revised take, including any ink, camera, or animation timing you want to retain. When you record a slide again, PowerPoint can replace its previous recording and associated presentation actions. Microsoft’s narration and timing documentation.
Play from the end of slide one into slide two and onward into slide three. Listen for a clipped opening, a shifted animation, and a sudden change in room sound. If a repair alters the duration, update your timing notes and compare it with what appears in the slide show. The new middle slide can sound good on its own and still create an abrupt join.
Export the recorded timings and inspect the actual video
Use the export-to-video command in the recording workflow. In versions with File > Export > Create a Video, choose the recorded timings and narrations option when creating the video. Select a quality setting appropriate to the recipient and allow the export to finish. Microsoft’s video export instructions.
Open the result in a normal video player. Check the first sentence, every slide change, any animated reveals, and the last line. Compare the video with the original deck at a small display size. A recording can have the right duration while the text becomes unreadable or the closing words disappear. If you need a caption file, create and verify it against this exported video, since the timing may have changed during repairs.
Send the delivery video separately from the editable deck and keep the approved script with the project. Use the three-slide recording worksheet for the timing and repair notes. For narration planning see the slide narration workflow. For timing instructions to visible actions, see the screen recording voiceover guide.
Frequently asked questions
Can I record just one slide?
Start from the current slide in the recording workflow. Save a copy before replacing an approved take, then check the neighboring slide transitions.
Why is part of the narration missing at a slide change?
Check whether the speaker began during the transition. Wait until the new slide is visible before speaking, then play the repaired join.
Why does my exported presentation move too quickly?
Check that the export uses recorded timings. Inspect any slide with no recording or timing, then play a short test export before rendering the whole deck.
Can viewers edit the recording in the exported video?
A video plays the rendered sequence. Give editors the PowerPoint master and the approved script so they can revise the relevant slide.
Should I include my webcam?
Include it when the presenter helps explain the material. Try one slide first and make sure the camera box leaves the important text and visuals visible.
Prepare a clean narration
Try one slide's approved script in Voice Lab, save the audio and compare its length with your slide timing.