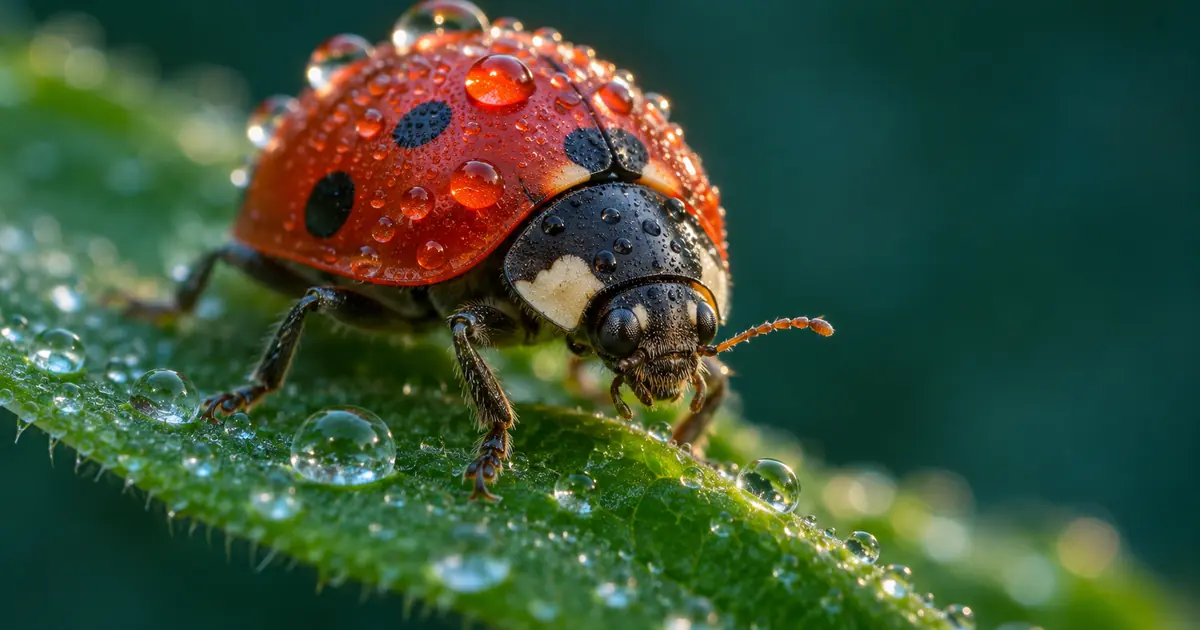

AI macro photography prompts need a clear focus decision. If every drop, leg, leaf and background detail competes for the same sharpness, the image can feel like a miniature illustration rather than a photograph. Name the subject, choose the detail that should be sharp and describe how the rest of the scene falls away.
This workflow develops nature close-up concepts with a visible scale relationship and a deliberate focus plane. It covers creative images, not scientific documentation. A realistic-looking insect or plant still needs independent evidence before you use it to identify a species or demonstrate a biological fact.
Choose one small subject and one sharp detail
Start with a narrow scene: a beetle on a leaf, a dew drop on a petal or a curled fern tip. Then choose the feature that should carry the frame. “The nearest eye and front edge of the wing case are sharp” is more useful than asking for extreme detail everywhere.
Decide how much context belongs in the image. A wider close-up might show the whole leaf and explain the insect's position. A tighter composition can emphasize a surface or droplet, but it may remove the information that helps a viewer judge scale.
Adobe's macro nature image guidance treats subject detail, lighting and creative direction as useful prompt inputs. The workflow here adds a review question before generation: which visible feature must remain clear when the image is viewed at its final size?
Describe the focus plane instead of adding resolution words
A photographic close-up often has a limited region that appears sharply focused. Use a concrete description of that region and the transition behind it. A prompt can ask for a crisp front dew drop, a softer petal behind it and a quiet out-of-focus background.
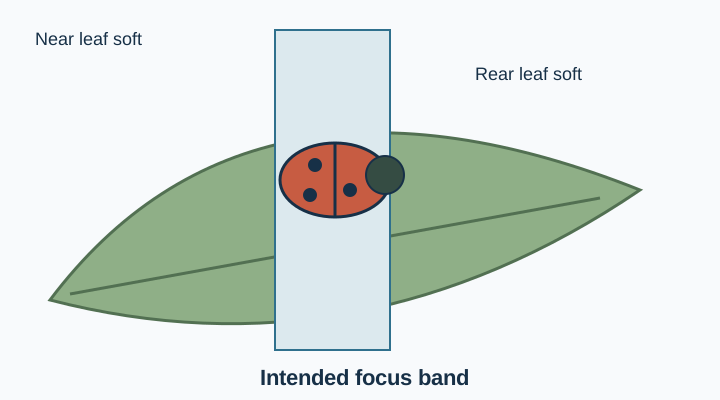
Terms such as macro lens, shallow depth of field and soft background can support the brief, but they do not establish actual lens magnification or output resolution. Inspect the delivered file rather than treating a camera phrase or an “8K” adjective as proof of technical quality.
Use the camera-settings prompt guide when you need broader language for framing and focus. Keep this macro request centered on one subject and one visible focus decision.
Keep the scale cues in agreement
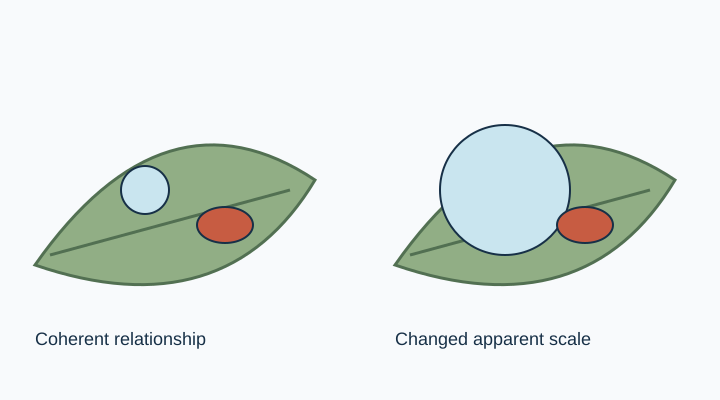
A dew drop, leaf vein and small insect create a scale relationship. If one drop becomes larger than the whole insect while the rest of the scene suggests ordinary morning moisture, the image may become a different concept than you intended.
Choose one reference relationship to hold fixed. For the example, the beetle sits on a leaf wide enough to support it, and the surrounding drops remain smaller than its body. That is a scene constraint, not a biological measurement of a real specimen.
Keep background objects simple. A distant fence or flower can help establish context, but too many recognizable objects may pull attention away from the small subject. A quiet background also makes duplicated edges and strange texture easier to notice.
Write a prompt that gives the image one job
Choose a restrained natural scene before introducing dramatic color or unusual materials. Begin with a single output so you can identify whether the main problem is focus, scale or subject structure.
Create a photographic macro nature concept of one small ladybird-like beetle on a dew-covered green leaf. Keep the nearest eye area, head and front wing-case edge in clear focus. Let the rear of the leaf and distant foliage fall gradually out of focus. Use soft morning side light, small believable dew drops and a quiet dark-green background. Keep the leaf, insect and drops at a coherent relative scale. No duplicated insects, extra visible limbs, repeated droplets, plastic surfaces, lettering or fantasy effects. Treat the subject as a creative concept, not a scientifically identified specimen.If you have a real reference you are authorized to use, explain its role. It might anchor the composition, the material surface or the exact animal. Those are different requirements. Do not assume an image reference guarantees the anatomy will be reproduced correctly.
Inspect anatomy and structure before polish
For an insect concept, follow the visible limbs from their attachment points rather than simply counting disconnected lines. A hidden leg may be plausible; a leg that grows from the wrong region is a structural problem. Check the antennae, wing boundaries and how the feet meet the surface.
For a plant, inspect repeated edges, veins and the connection between stem and leaf. A detailed texture can hide a petal that merges into another object. Use a trusted real reference when exact botanical or anatomical accuracy is part of the task.
Keep scientific and documentary uses separate from creative approval. A visually convincing generated image does not establish that a real organism has the pictured traits or that a real event occurred. The image fact-check workflow provides a broader evidence check when an image will support a factual claim.
Give droplets a surface relationship
Check where each drop touches the leaf or petal. It should belong to that surface rather than float in front of it. Look for repeated identical droplets, edges that ignore the leaf's curve and bright spots that imply several conflicting light sources.
A close-up does not need dozens of drops. Reducing their number can make both the subject and the focus transition easier to read. Change that one part of the prompt before adding more contrast or sharpening.
If the model turns the leaf into glossy plastic, simplify the material language. Describe a natural surface with a few visible veins and restrained highlights. A request for maximum shine and maximum detail can fight the appearance you are trying to obtain.
Compare one revision against the original brief
Save the first candidate and write a short reason for the revision: move the focus toward the head, reduce oversized drops or simplify the background. Keep the subject, framing and light unchanged when they already work.
Review the result at full size and at the size where it will appear. A dramatic close-up may look impressive when enlarged while its focal subject disappears as a small card image. Choose the crop after you know the subject still reads clearly.
Download the macro review worksheet below. It separates focus, scale, structure, surface contact and intended use so an attractive color treatment cannot substitute for the other checks.
Build the concept in QuestStudio
Use Image Lab to explore the bounded macro brief, then compare the result with your focus and scale notes. Use Prompt Lab to keep the approved wording and a record of the change you tested.
The landscape prompt guide concerns a wider environment. A macro concept succeeds through a smaller decision: one convincing subject, one readable focus region and enough surrounding evidence to make the scene feel coherent.
Download the macro-focus worksheet and replace its fictional example entries with your own approved sources.
Frequently asked questions
Do macro lens words guarantee a real macro photograph?
No. They describe an intended visual treatment in a generated image. They do not prove physical magnification, a camera setup or measured output resolution.
Should the entire insect be sharp?
Choose the depth of focus that serves the image. Make the important feature readable and keep the transition believable rather than demanding equal sharpness everywhere.
Can I use the result for species identification?
Do not rely on a generated image as identification evidence. Check a real specimen or trusted real reference when factual anatomy matters.
Why do the dew drops look artificial?
Look for excessive size, repeated shapes, floating contact and conflicting highlights. Try fewer drops and a simpler light direction before adding more effects.
What belongs in the final review?
Check focus, scale, subject structure, surface contact and the intended use. Inspect the final-size crop as well as the enlarged image.