
The mix is finished, the export panel says 16-bit, and a dither menu appears. Turning it on feels odd because it adds noise. Leaving it off feels safer because the file should be clean. The useful question is what happens when the working audio is rounded into fewer available sample values.
I treat dither as part of a controlled final export, not as an effect that makes every track sound better. Keep the working master, confirm the requested format, and make the bit-depth reduction deliberately.
What dither changes
Reducing audio to a lower integer bit depth quantizes sample values onto a coarser set of levels. Without suitable dither, the resulting error can follow the signal in a structured way. Dither introduces a small random component before quantization to change that error behavior.
The Audacity dither manual explains the relationship between rounding and low-level distortion. The goal is not a visibly smoother line in a waveform display. It is a better-behaved conversion at very low levels.
Dither does not remove microphone noise, repair a clipped vocal, or make a weak mix more exciting. If those are the problems, solve them earlier. I would not judge an entire mastering chain by whether its dither control is enabled.
See what happens near one quantization step
For this guide, I generated a half-second 997 Hz sine wave at 48 kHz. Its peak is only 0.7 of one 16-bit integer step, so it deliberately lives near the rounding boundary. One version is rounded directly. The other adds triangular probability density function, or TPDF, dither before rounding.
The example's TPDF noise is the difference between two independent uniform random values in step units. It spans −1 to +1 step before rounding. iZotope's RX dither documentation describes that standard unshaped distribution; this fixture does not use its proprietary processing.
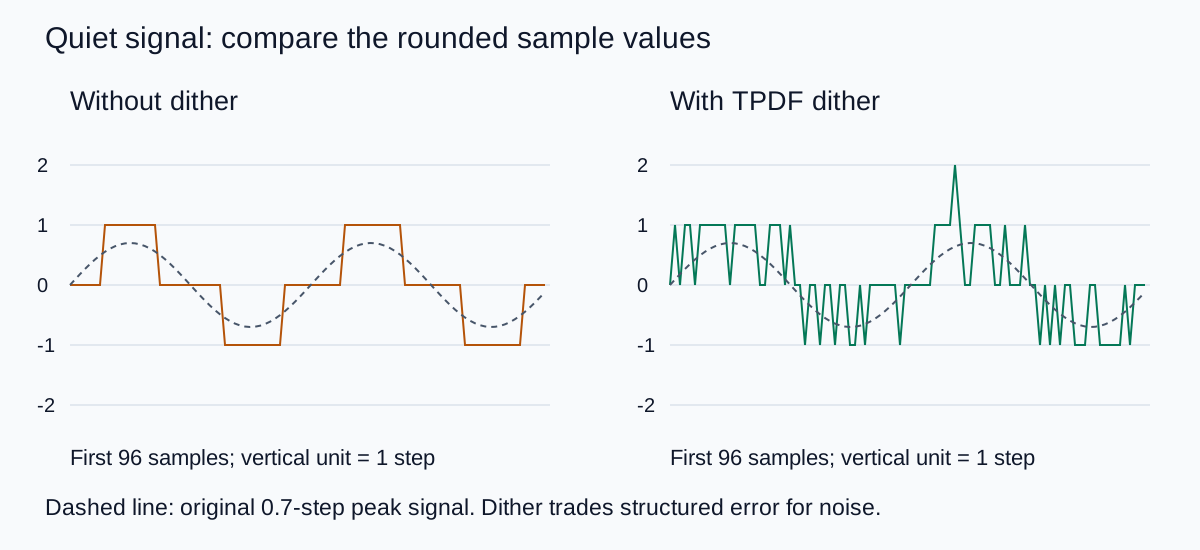
That last point matters: the dithered samples are not individually closer to the original every time. Adding randomness trades one kind of error behavior for another. A screenshot of a jagged waveform is therefore a poor way to decide whether the conversion did its job.
Download the original 16-bit WAV comparison and method note if you want to inspect the files. They are extremely quiet by design. The listening previews below apply the same +72 dB gain before MP3 encoding so you can audition the character at a normal device volume. They are demonstrations, not measurement files or examples of normal listening loudness.
The source values, fixed random seed, and distribution are recorded in the download. This experiment isolates a quiet synthetic signal. It does not establish that the difference will be obvious in a busy music mix at ordinary playback levels.
First decide whether 16-bit is actually required
I would read the delivery brief before choosing a bit depth. A collaborator may want a high-quality working file for further processing, while another destination may specifically require 16-bit PCM. Those are different deliverables, and you can preserve a working master while creating the requested copy.
Do not reduce the master just to make a number match a familiar preset. Keep enough precision for the remaining processing in your editor, then make the final integer conversion when the work is ready. The 32-bit float guide explains why a working format and a delivery format do not have to be identical.
Also separate bit depth from sample rate and compressed bitrate. A menu that says 48 kHz is not choosing 16-bit, and an MP3 bitrate is not a PCM bit-depth setting. If the terminology is getting mixed together, resolve the target format before adjusting dither options.
Choose one deliberate conversion stage
- Save the working master. Keep the editable project and a suitable high-precision source before creating the delivery copy.
- Finish the required processing. Check gain, fades, limiting, and any sample-rate conversion in the intended chain.
- Inspect existing dither settings. A mastering plugin and an export panel may both offer the option. Know which stage is responsible for the final bit-depth conversion.
- Match the target depth. Use the processor's documented setting for the actual output rather than assuming its default matches the brief.
- Export and reopen the file. Confirm format, rate, channels, duration, and the beginning and end of the audio.
“Only once” is a useful finishing habit, but it should not become a reason to skip a necessary conversion after further processing. If you revise the mix, return to the high-precision source and make a fresh final export. Avoid repeatedly processing an already reduced delivery copy when the original is available.
For an unchanged 16-bit source copied to another 16-bit file without processing, there may be no new precision reduction to dither. The Audacity manual discusses this distinction. Check what the application actually did, including gain changes and fades, rather than deciding only from the source filename.
Keep noise shaping separate from the basic decision
Some dither tools also offer noise shaping, which redistributes the noise spectrum. That is a separate choice from whether the final reduction is dithered. More aggressive options are not automatically better for every destination or later processing chain.
I would start with the editor's documented, appropriate default for the intended output and avoid changing several advanced controls during a rushed export. If a mastering engineer or client specifies a method, follow that requirement and record it with the file.
The fixture above deliberately uses plain TPDF without noise shaping. That keeps the demonstration understandable and reproducible. It is not a ranking of commercial dithering algorithms.
Put this at the end of an AI music workflow
Use QuestStudio Music Lab to create a cue that works musically, then inspect the downloaded source and finish it in your audio editor. Dither belongs to the export decision; it does not rescue an awkward transition or a distorted source.
I would approve the structure and the ending before spending time on this setting. The AI music mastering workflow covers source selection, comparison, and listening-level discipline. Once those decisions are settled, create the requested delivery version from the best available master.
If another editor will continue working, include the file properties and whether final dithering was applied. The cue-sheet handoff guide helps keep that information attached to the actual music file.
Make the final check proportional
Listen to the exported beginning, the quietest important passage, and the ending at a normal level. Check for accidental truncation, an unwanted fade, or a format mismatch. Keep the deliberately amplified demonstration separate from that real-world approval.
My recommendation is to understand the conversion, save the right source, and move on once the deliverable is correct. Dither deserves a deliberate setting, not an endless search for a dramatic audible transformation.
Frequently asked questions
What is audio dithering?
Dithering adds a small random component before quantization to change the behavior of rounding error when reducing audio precision. It is a conversion technique, not noise removal.
Should I dither when exporting a processed mix to 16-bit PCM?
Use an appropriate dither method for the final reduction from a higher-precision working signal, following the editor or mastering processor documentation. Keep the higher-precision master for later revisions.
Does dither repair clipping or improve a poor recording?
No. Fix source and mix problems earlier. Dither addresses low-level quantization behavior during a precision reduction.
Should I enable dither in both a plugin and the export panel?
Know which stage performs the final conversion and avoid accidentally stacking independent dither stages. If you revise the mix, return to the working master and create a fresh delivery copy.
Why are the comparison previews amplified so much?
The original fixture is deliberately close to one 16-bit quantization step. Both previews apply identical +72 dB gain to expose the difference. That is not representative of normal listening levels, and the lossless download is the measurement source.
Technical references
Continue with a useful next step
 Music
AI Music Mastering: Compare the Sound, Not Just the Loudness
Evaluate an AI music master with a level-matched comparison, an original listening log, source repair decisions, and destination-specific delivery checks.
 Creator Workflows
32-Bit Float Audio: What It Can and Cannot Fix
Understand 32-bit float recording without the hype. Separate file headroom from microphone overload, wireless dropouts and the audio sent to your phone.
 Music
AI Music Cue Sheet: Track Versions, Uses and Durations
Prepare an AI music cue sheet for an editor with exact filenames, used ranges and durations. Separate production tracking from rights records with a CSV sheet.
Hero: AI-generated editorial illustration. Supporting diagrams and exercises: QuestStudio.