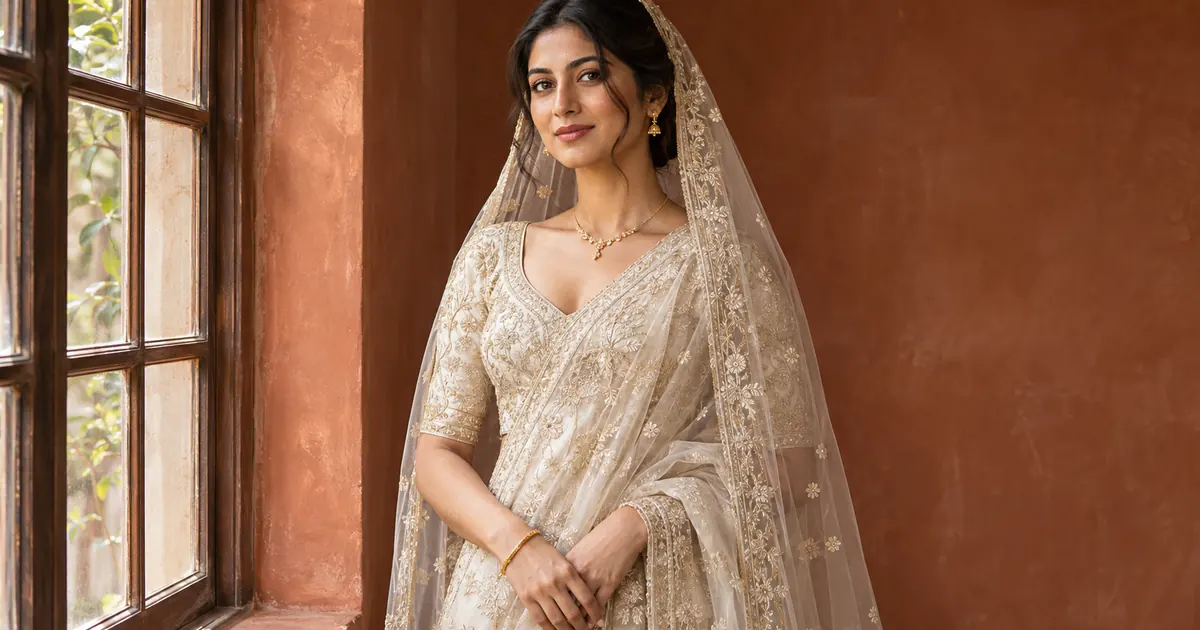

AI bridal portrait prompts should begin with the person and the actual outfit. A beautiful result can still be wrong when the veil turns opaque, a lace edge changes or the face becomes a different person. Treat the portrait as a controlled concept: one authorized adult reference, one approved garment direction and one lighting decision at a time.
This workflow develops a solo bridal portrait rather than a couple scene or ceremony reconstruction. Its main comparison is between window light that reveals fabric and a stronger edge light that separates a translucent veil. The diagrams explain those choices; your actual outputs still need direct review.
Choose a portrait purpose before a style
Decide whether you are exploring a look, preparing a photographer's moodboard or creating a personal editorial image. Each purpose changes what you need to preserve. A garment reference used to plan a real shoot needs more careful construction review than a loosely imagined fashion concept.
Keep concept images separate from photographs that document the wedding. Do not imply that a generated outfit, location or moment was captured at the real event. A clear project folder and filename can preserve that distinction without adding distracting text to the image itself.
If your task is an invitation, use the wedding invitation workflow to manage names, dates and print files. This portrait project concerns the person, fabric and light rather than the invitation layout.
Build a reference set with different roles
Choose a clear face reference with natural lighting, a full or mid-length outfit reference, and a detail reference for the veil or embroidery. Label their roles explicitly. A close view of jewelry should support that accessory, not replace the face reference.
Write down the details that belong to the approved look: garment color, neckline, sleeve length, fabric, veil attachment and the jewelry actually selected. Use the person's own description for cultural or ceremonial details. Do not let a generic bridal label replace a specific outfit with a different tradition.
The face source should show the features you need to preserve. If hair covers one eye or a filter changes the skin texture, use another reference where possible. More references are not automatically better; contradictory hairstyles or different outfits can make the intended result less clear.
Ask for one restrained window-light portrait
Start with the simplest light direction and a quiet background. Keep the face and garment visible enough to compare with the source. A dramatic close crop can hide the very outfit details the concept was meant to explore.
Use authorized adult reference A for the person's recognizable face and proportions, reference B for the approved bridal outfit, and reference C only for the veil detail. Create a mid-length solo bridal portrait beside a window to camera-left. Preserve the person's apparent age, natural skin tone, facial structure and hairstyle. Keep the approved neckline, sleeves, embroidery, jewelry and veil attachment. Use soft directional daylight and a quiet warm wall. Do not redesign the garment, add accessories, change body proportions or invent a ceremony.Review the first image before requesting another lighting treatment. Check the face, then the garment, then the accessories. If the outfit is wrong, correcting its description is more useful than adding more adjectives about realism.
Separate veil transparency from brightness
A translucent veil can be bright without becoming a solid white sheet. Look for believable fabric density, a consistent edge and the parts of the background that should remain visible through it. A light patch that erases embroidery is not automatically a convincing bridal glow.
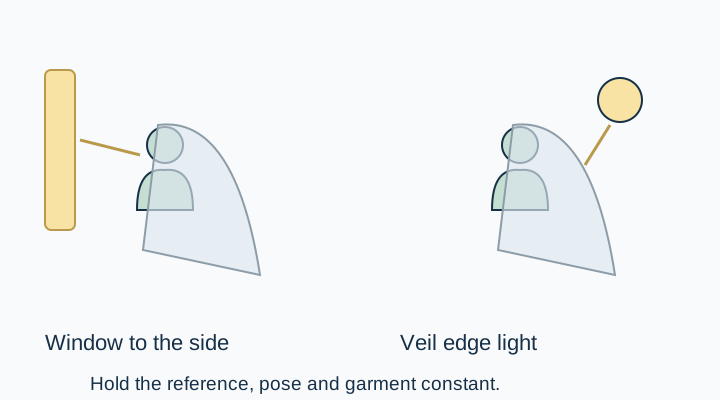
For the second test, ask for a restrained edge light on the veil while holding the rest of the scene constant. Compare whether it helps separate the fabric from the background. If it also changes the face, pose and outfit, the comparison no longer isolates the lighting decision.
Use the camera and lighting prompt guide for language that identifies a source and direction. Do not treat lens or exposure words inside a prompt as proof that the generated image came from a physical camera setup.
Inspect lace as a boundary, not just a texture
Follow the neckline, cuff and veil edge. Does the lace stop where the garment stops? Does a repeated motif jump from the veil onto the skin? Look for embroidery that turns into jewelry or a transparent panel that becomes an extra sleeve.
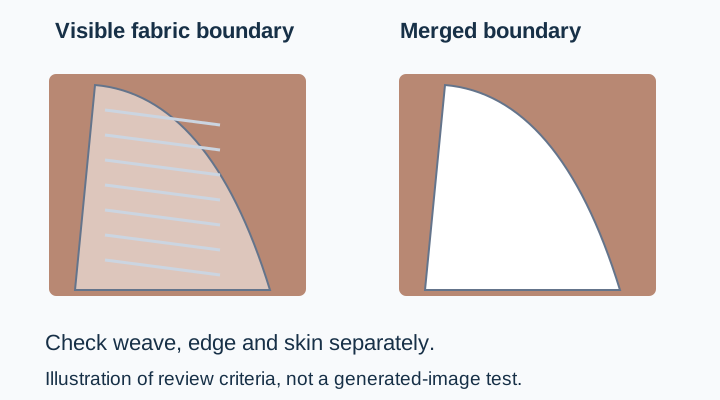
At a useful zoom, compare the major motif placement with the outfit reference. Exact reproduction may require a conventional editing or compositing workflow using the actual garment image. If the purpose is to approve a real garment, reject invented details rather than accepting them as creative interpretation.
Avoid adding texture everywhere to hide errors. Fine fabric, skin and background should not all have the same sharpness or grain. An image can contain abundant detail while still describing the wrong material.
Review jewelry without letting it take over
Count the visible earrings, necklace elements and bracelets that matter to the approved look. Check that each accessory connects plausibly and does not merge with hair or fabric. A changed stone or extra pendant can alter a meaningful personal detail.
For close product-like jewelry review, use the jewelry photography guide. In a bridal portrait, the jewelry supports the person; you do not need to make every small reflective surface equally prominent.
If a piece carries personal or ceremonial significance, keep a real detail reference and ask the person to approve its appearance. The assistant should not infer the meaning or correct form of an accessory from a broad cultural label.
Check likeness before choosing the most flattering frame
Compare the face at approximately the same size as the source. Look at the eyes, nose, jawline, apparent age and natural skin tone. Then compare the relationship between face, neck and hands. Changes can be subtle when the background and fabric look convincing.
Choose a frame that preserves the person, not simply the one with the most polished skin. The realistic portrait guide explains reference-first portrait review in more detail. Keep the bridal checklist focused on the additional garment and veil decisions.
Download the portrait approval worksheet and record the source roles, requested lighting change and review result. Save a rejected concept separately so it cannot accidentally become the reference for the next generation.
Develop the concept in QuestStudio
Use Image Lab to explore the approved solo portrait direction. Start with the reference set and a small brief, then compare the output against each reference's role. Where an exact garment detail cannot be preserved, use the real image or a more controlled edit.
The finished handoff should contain one approved concept, the reference list and a clear explanation of the light you want. That gives a real photographer or editor something concrete to work from without turning the person into a generic bridal character.
Download the bridal portrait approval worksheet and replace its fictional example entries with your own approved sources.
Frequently asked questions
Do I need a separate veil reference?
Use one when the weave, attachment or edge matters and is not clear in the outfit photograph. Give it a specific supporting role.
Can the prompt guarantee the same face?
No. A reference and preservation instructions establish the goal, but the output still needs a likeness review against the source.
Why does the veil become a white block?
The model may reinterpret the fabric or lose transparency in a bright area. Simplify the light, use a clear detail reference and inspect the edge and background visibility.
Should I change the outfit and light together?
For a useful comparison, keep the outfit fixed while changing the light. Resolve garment accuracy before exploring another lighting treatment.
Can I use the concept in a wedding album?
Keep a generated concept separate from the documentary photographs unless its creative role is clear. Do not present an invented scene as a captured wedding moment.