
To blend two images in Canva, place one photo over the other, select the top photo, and adjust Transparency. That works when you want the entire top image to become less opaque. For a smooth edge where the main subject stays solid, use an overlay with a transparent fade already in the file or a gradient that matches a solid background.
The difference matters. Lowering opacity can make two photos look like they were printed on the same sheet, but the edges of the top rectangle can still be visible. A feathered edge changes the opacity across the edge rather than across the whole photo.
Start with the actual placement
Place the bottom photo and set its crop first. Add the second image and move it above the first. Check which part of the bottom photo should remain visible. For a wide header, you might keep the main subject on the right and leave a quiet area on the left for text. The hero image planning guide explains how to test desktop and mobile crops before designing around them.
Try the Transparency control on the top photo. Canva describes the control in its element transparency help. A whole-photo change is useful for a subtle texture or a secondary image. If the subject looks washed out while the straight border remains, return the photo to its intended strength and change the edge instead.
Keep the photo and heading separate. If you place the type inside a flattened composite, you may have to rebuild the image to revise a word. Leave room for the actual heading so the finished blend remains useful after the copy changes.
Pick a fade that matches the background
For a solid color field, a gradient that starts opaque in the background color and ends transparent can hide a photo edge. Place it over the area where the photo meets the field. Match the solid end to the field and point the transparent end toward the photo. If the two colors differ, the gradient becomes another visible band.
For a busy background, use a top image with an actual alpha fade. A flat overlay gradient can tint the bottom photo and leave a visible patch instead of revealing it. Prepare the top image in a layer editor with a mask, export a PNG with transparency, then upload that overlay to Canva. Keep the original editable file so you can change the mask later.
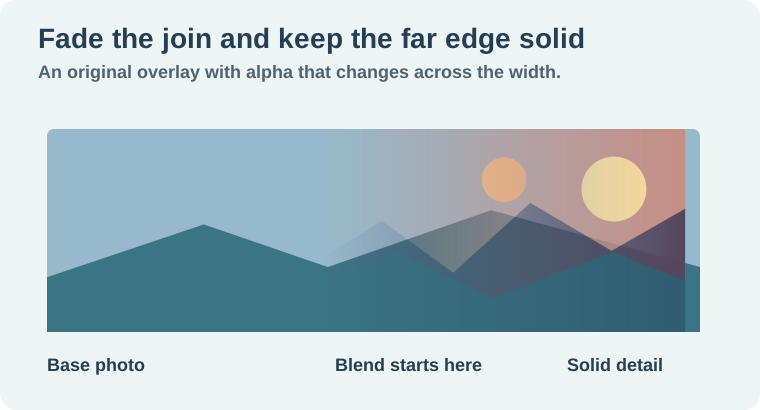
The example artwork for this guide includes a small transparent overlay. Place it over a busy background to see the fade and over a solid field to see where the opacity changes. Use it as a learning sample. For the actual design, make the edge where your image needs it.
Work through a two-photo cover
Imagine a mountain photo on the left and a workshop photo on the right. The cover needs the workshop subject to remain strong. Put the mountain photo at the bottom. Overlap the workshop photo so its left edge falls in a quiet area of the mountain image. Feather the left edge of the workshop image while preserving its main subject.
Compare three proofs. In the first, use the hard rectangular edge. In the second, lower the whole top image and see whether the workshop subject looks transparent. In the third, use a feathered edge and compare the same subject. Check whether any lines meet awkwardly across the blend. Moving the overlap a little can help more than widening the fade.
If the photos have different light direction or color temperature, the seam can remain visible even after you smooth it. Use the product compositing guide to review lighting and color separately. A believable edge cannot make two incompatible shadows agree.
Check the export where it will appear
Export a copy and reopen it. At thumbnail size, check the seam and the heading first. Zoom in to look for a dark edge, a pale fringe or transparency where you expected the subject to stay opaque. Review the layout on both a light and a dark page if it will travel between backgrounds.
When the image sits in a Canva frame, inspect the frame crop as well. The Canva frame replacement guide explains how to check which part of the source is still visible after repositioning it. An edge that looks clean on the wide version can be cut off in a narrower design.
Compare both techniques in the exported file
Place the example overlay so its transparent left edge crosses a low-detail area of the base. The right edge is opaque. Duplicate the page and lower the transparency control for the whole overlay on that copy. Export both pages at the same size and open them outside Canva. In the first, the far-right shape should keep its color while the join reveals the base. In the second, the base should show through farther into the overlay because Canva has reduced the opacity of the whole layer. If you see a hard vertical line, check that the imported file was the original PNG and that you have room for the fade inside the overlap.
How QuestStudio helps
Use Image Lab to prepare a separate background or supporting photo with enough quiet space for a blend. Keep the actual fade in the editable composite so you can change its edge without regenerating the subject. Save the proof that shows the intended seam and the final crop.
Download the original transparent overlay PNG used in the example.
Download the canva photo blend worksheet.
Frequently asked questions
Does Transparency make a feathered edge?
The usual Transparency control changes the whole selected element. Use a feathered overlay when only the edge should fade.
Can a gradient hide a straight seam?
It can work when the solid end matches the background. A busy image usually needs a transparent fade in the top layer.
Why does my subject look washed out?
The whole layer may be partially transparent. Keep the subject opaque and fade only its boundary.
What should I export from the masking editor?
Use a format that supports transparency, such as PNG, and confirm the file has the expected alpha.
How do I check the final blend?
Reopen the export at final size and inspect the edge, subject and heading in context.