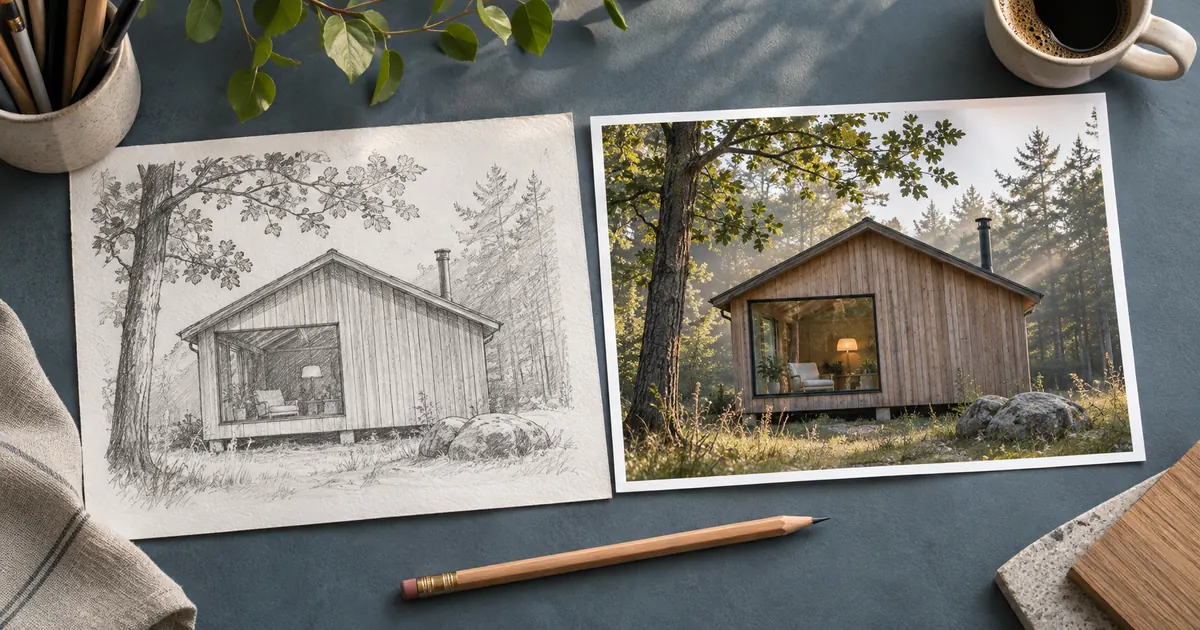

Sketch-to-photo prompts should preserve the decisions you already drew. A render that adds beautiful materials but moves the main window, changes the roof or replaces the camera angle may be attractive and still fail the brief. Start by naming the composition anchors, then vary surface and light without treating the design as an open suggestion.
This workflow turns a simple cabin sketch into a photographic concept. Its output is a visual exploration, not a measured building plan. The same method can help with a product drawing or a staged scene when the layout matters more than creating a new composition.
Decide which lines carry design information
A sketch contains several kinds of marks. Some define the silhouette, some identify material, and others are loose shading. Tell the model which lines must control the result instead of expecting it to interpret every stroke correctly.
For the fictional cabin, the anchors are the roof peak, four main wall corners, one large front window and a tree at the left edge. Shading beneath the roof indicates a shadow, not another structural beam. Write that distinction in a short note before generating.
If a line is ambiguous even to you, clarify the drawing. A quick clean pass that separates the wall edge from a scribbled shadow can be more valuable than a longer prompt. Keep an untouched copy of the original so you can later see which design decisions changed.
Mark a few composition anchors
Choose five to eight visible points that make the image recognizable. Record their position relative to the frame, not only relative to another object. The roof peak may stay above the window while the entire cabin shifts to the wrong side of the image.
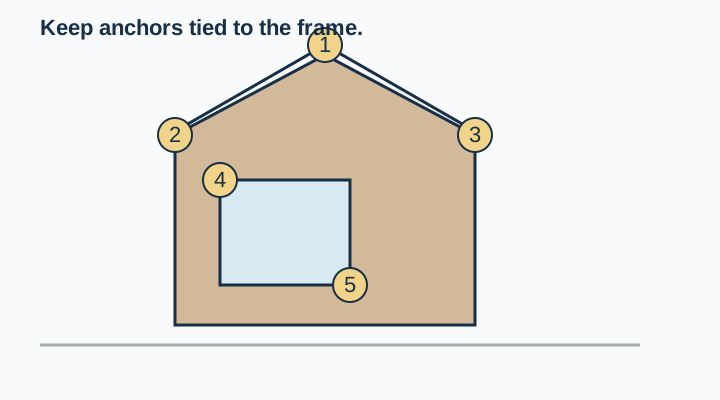
Use a simple grid or a transparent overlay in an image editor. You are looking for meaningful drift: a different silhouette, a moved opening or a new viewpoint. Do not demand pixel-perfect agreement from a loose freehand line unless your workflow actually requires and supports it.
For early composition exploration, the Krea realtime drawing guide serves a different job. This workflow begins after you have chosen the arrangement and want to protect it while adding a photographic surface.
Give the sketch and text separate jobs
Let the drawing define placement and the text define material, light and atmosphere. A prompt that describes a different camera angle fights the reference before generation begins. Keep “front three-quarter view” out if your sketch clearly shows a straight-on view you intend to preserve.
Use the attached original cabin sketch as the composition reference. Preserve the roof silhouette, wall corners, single large front window, camera viewpoint and the tree position marked in the drawing. Interpret loose gray strokes as shading, not extra structural elements. Render a photographic concept with weathered timber walls, a matte dark roof and soft overcast daylight. Add believable material texture without adding doors, windows, extensions or objects. Keep the frame and object positions consistent with the sketch. Flag ambiguity rather than redesigning the cabin.Not every tool has the same reference controls. Adobe's sketch-to-image tutorial describes using a sketch to guide composition and adjusting its influence. Check the controls available in your current tool rather than copying a setting name from another provider.
Runway's sketch-to-render guide also discusses the trade-off between a reference's structure and the freedom to invent details. Those concepts help you diagnose a result, but they do not guarantee that every line will survive unchanged.
Make one material variation first
Start with a restrained photographic interpretation. Keep the light broad and the background quiet so the outline is easy to compare. Highly dramatic shadows can hide a changed wall, while dense vegetation can conceal a moved corner.
Compare the render with the sketch before making a second style. Check the anchors in order, then inspect any new objects. A model may add a small window because it makes a facade feel more plausible. If that opening was not part of the brief, it is a design change rather than a harmless detail.
If the structure passes, change one surface treatment. For example, test lighter timber while holding the roof, window and light direction fixed. Save the accepted composition as the reference for that experiment, alongside the original drawing, so you can distinguish accumulated drift from a deliberate change.
Use an overlay to find the change
Place the source sketch over the render at the same frame size in an image editor. Reduce its opacity or use a blend mode that reveals the major lines. Align the canvas boundaries first. Do not stretch the sketch separately until it happens to match a changed building.
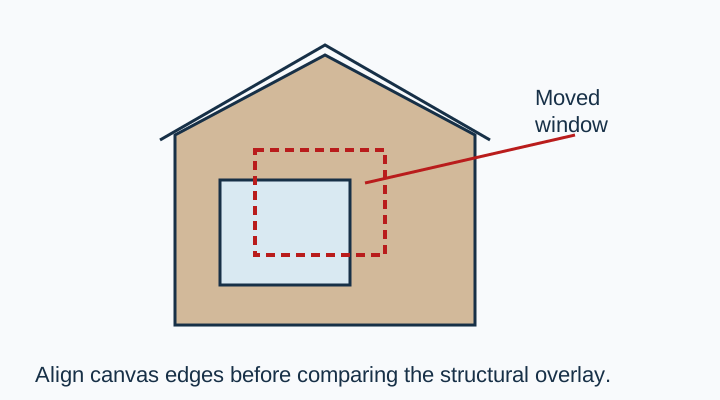
Look for patterns in the error. If all anchors move together, the output may have reframed the scene. If only a window moves, the model may have reinterpreted the facade. If the roof changes, simplify the geometry instructions or clarify the sketch before trying another decorative treatment.
The overlay is a review aid, not proof of construction accuracy. A visually aligned exterior can still contain impossible geometry or unsupported interior space. Use measured drawings and professional review for decisions that depend on real dimensions or building feasibility.
Fix the smallest failed region
When a tool supports local editing, isolate a clear error such as an added window. Refer back to the original sketch and specify what belongs there. Keep the rest of the approved composition out of the creative request.
If local corrections repeatedly change nearby structure, return to an earlier source and simplify the task. Avoid collecting small fixes on top of a render that has already lost the original viewpoint. The image reference-pack workflow helps separate structural and material references when one image is being asked to do too much.
Keep rejected renders in a review folder with a short reason. “Roof changed” is more useful than “bad image.” It tells the next person whether to improve the sketch, change a reference control or narrow the prompt.
Prepare an honest handoff
Export the approved concept with the original sketch, a material note and a list of accepted changes. Mark any invented detail that remains. If the next person needs exact geometry, provide the measured design source rather than the photorealistic concept alone.
Download the anchor-review worksheet and record each anchor's status. Include the source version so a later drawing update does not leave an old render looking current. A visual concept is ready when its purpose and limits are clear enough for someone else to use it correctly.
Explore the material in QuestStudio
Use Image Lab with your drawing as the reference to explore one restrained photographic direction. Compare the result with the anchor map before saving another variation. Keep the approved prompt and material choices together for a repeatable handoff.
For broader scene language, the realistic image prompt formula helps describe subject, light and finish. Here, those words support a chosen design; they should not quietly replace it.
Download the anchor-review worksheet and replace its fictional example entries with your own approved sources.
Frequently asked questions
Can a sketch-to-photo prompt preserve exact dimensions?
Do not rely on a generated image for measured geometry. Use a proper measured design source when dimensions or construction decisions matter.
Why does the render add a window or door?
The model may reinterpret ambiguous marks or fill in a plausible design. Clarify the sketch and list the features that must remain fixed.
Should I redraw every sketch line cleanly?
Clarify the lines that carry important structure. You do not need to polish decorative shading that the prompt clearly identifies as non-structural.
How do I compare two material variations fairly?
Hold the composition, camera and light fixed, then change one material decision. Check both against the original anchors before judging the finish.
Is a photographic render proof that the design can be built?
No. A convincing surface can hide structural errors. Treat it as a concept and use appropriate measured and professional review for real-world design decisions.