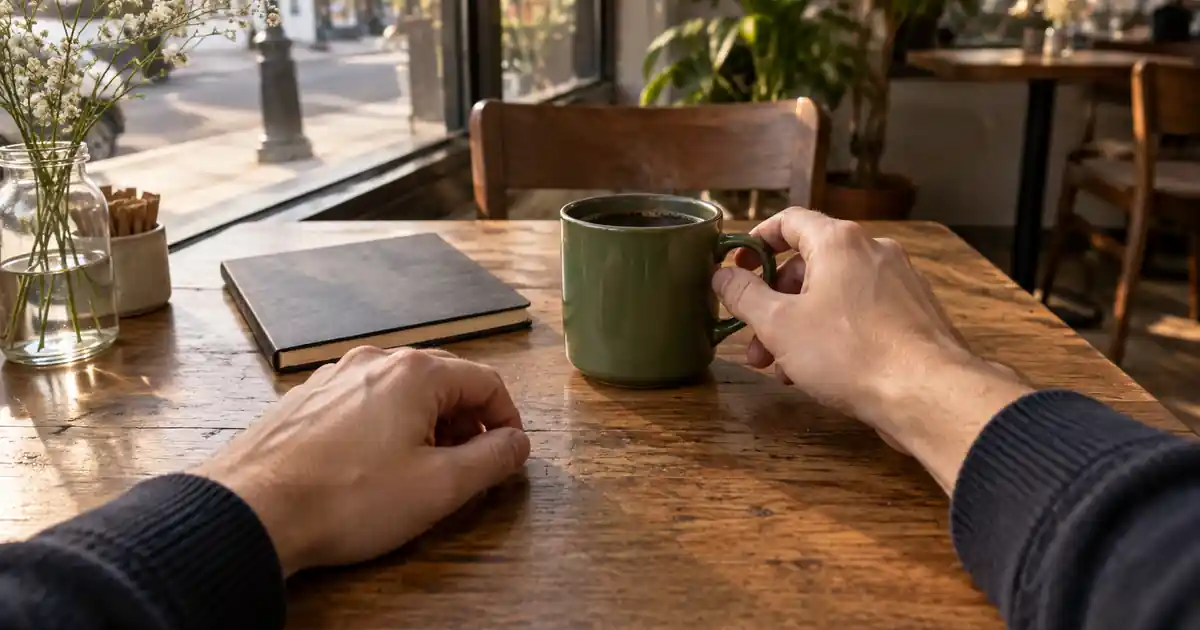

A video labeled POV can still feel like a camera following someone else. True first-person perspective puts the viewer at the character’s eye position. The hands, reachable objects, movement, and sound need to agree with that position. AI video becomes easier to direct when you define those relationships before asking for a long sequence of actions.
Download the first-person continuity and three-frame audit · Try a short POV action in Video Lab
Define whose eyes the camera represents
Write one plain sentence: “The viewer is seated at a cafe table, looking slightly down at a mug.” That sentence establishes posture, eye height, gaze, and the scene’s scale. “A cinematic POV in a cafe” leaves most of those decisions open.
First person is not the same as an over-the-shoulder shot. If the camera moves behind the character and shows the back of their head, the perspective has changed. It is also different from a floating camera traveling through a room without a plausible body attached to it.
Runway’s camera terminology examples provide vocabulary for describing viewpoint. Use those terms as directions, then inspect the generated shot. A correct term in the prompt does not establish that every frame maintains that perspective.
Build the first frame around a reachable action
Choose a simple tabletop scene for your first attempt. A mug near the center, a notebook to one side, and forearms entering from the bottom of the frame establish a clear body-to-object relationship. Keep the object within a plausible arm’s reach from the seated position.
Avoid a source image that already contradicts the requested perspective. A photo showing a person from across the table cannot become their eye view without inventing a new composition. If you use image-to-video, approve the first-person still before animating it. Check that the hands enter from where the body would be.
Keep the frame uncluttered. A hand reaching through several overlapping objects gives the model more opportunities to merge surfaces or teleport the target. Start with a stable table, one object, and a clear path. Add visual complexity after the basic contact works.
Write a continuity record before the motion brief
| Element | Example decision | What should not drift |
|---|---|---|
| Eye position | Seated, slightly downward gaze | Sudden standing height or external camera view |
| Hands | Right hand reaches; left rests on table | Extra fingers, swapped hands, changing skin detail |
| Clothing | Dark navy sleeves | Sleeve length or color changing mid-shot |
| Object | Green mug with handle to the right | Handle position, shape, and size |
| Environment | Window on the viewer’s left | Light direction or table geometry |
| Action | Reach and touch the handle | Unexpected lift, pour, or camera orbit |
Treat the record as a continuity plan, not an exhaustive description of the character. A first-person shot does not need a long paragraph about a face that never appears. Spend the instruction budget on what the viewer will actually see and what the action requires.
Distinctive accessories can help link shots, but they also add failure points. A complex watch, patterned ring, or sleeve logo may deform during hand movement. Use simple, readable details unless the story specifically needs something more elaborate.
Give the clip one physical action
This shot ends at contact. It does not also lift the mug, drink, put it down, open the notebook, and look toward the door. Breaking the sequence into small actions makes failures easier to identify and gives the editor usable cut points.
Describe the motion positively and concretely. “The right hand reaches to the handle” tells the model more than “make a realistic POV.” Keep any exclusions short and tied to observed failures. If a model repeatedly changes the view, specify that the camera remains the character’s eyes for the whole shot and remove contradictory cinematic movement language.
Inspect the three frames that reveal most failures
Review the starting frame, the moment of contact, and the final frame. At the start, ask whether the camera position and body parts describe one plausible person. At contact, check whether the hand meets the object’s surface. At the end, verify that the perspective and object identity remain intact.
The contact frame deserves close attention. Fingers may pass through the handle, the mug may slide before the hand reaches it, or the wrist may bend in an impossible direction. A smooth-looking clip can hide these failures during normal playback. Pause where the action transfers force from the hand to the object.
Then watch the full shot at normal speed. A technically plausible paused frame does not guarantee natural movement between frames. Look for sudden acceleration, elastic fingers, object scale changes, and the camera drifting independently of the implied body. Approve both the still relationships and the motion.
Diagnose perspective drift before adding more detail
| Failure | First correction to try |
|---|---|
| Character appears on screen from outside | Remove external camera language and restate eye-position viewpoint |
| Camera floats across the table | Reduce travel to subtle head movement or a fixed seated view |
| Arm stretches to a distant object | Move the target closer in the starting composition |
| Hands swap or multiply | Limit the shot to one active hand and one simple action |
| Object changes during contact | Simplify the object and shorten the interaction |
| Scene turns into a montage | Ask for one continuous shot with one action |
Revise the smallest part that explains the problem. If the arm cannot reach the mug, changing the color palette will not help. If the camera swings behind the person, adding more hand detail does not address the viewpoint instruction.
Keep accepted source frames and name candidates by the change you tested. That makes it possible to learn from the attempts. Without a record, you may alternate between the same two failed compositions without noticing what each one actually solved.
Join several shots without losing the same person
Once a reach-and-touch shot works, plan the next action from a compatible ending state. The hand should begin where it previously stopped, the mug handle should face the same direction, and the notebook should remain on the same side. When a tool supports an appropriate reference workflow, use the accepted frame as continuity material.
Do not assume separate generations share memory of the scene. Include the important visible details in each shot plan and inspect the join. A matching sleeve color is not enough if the mug doubles in size or the camera jumps from seated to standing height.
Use an intentional cut when exact continuity is unreliable. For example, cut from the hand reaching to a closer first-person view of the mug already held. The edit can imply the transition without displaying a broken grasp. Keep the implied action understandable rather than hiding a confusing change behind a flashy transition.
Give sound the same point of view
A close hand touching a mug should not sound as if it happens across a large hall. Choose small contact sounds and a restrained cafe ambience that match the viewpoint. If a window or source is clearly on one side, keep any spatial treatment consistent rather than moving sound randomly around the listener.
Avoid adding breath, footsteps, or cloth movement simply because the video is first person. Use cues that the scene supports. A seated tabletop action does not need walking sounds, and excessive breathing can distract from the object interaction.
Listen with the final visuals. Align the contact cue to the visible touch, not just the nearest cut. If the sound makes you notice that the hand never actually reaches the mug, fix the shot or choose a different edit. Audio should support plausible action, not cover up a contradiction.
How QuestStudio helps with a short POV trial
Use Video Lab to test one short action with a model suited to your intended inputs. A supported image-to-video workflow can help you begin from an approved first-person composition, but it still requires the three-frame and full-motion reviews.
The cinematic video workflow helps organize the wider sequence after the first shot works. Save the source frame, continuity record, motion brief, accepted clip, and usable section. That record is more useful for the next scene than a collection of increasingly elaborate prompts.
About this guide
This is an editorial production method, not a claim that every AI model can perform every step. Examples and worksheets are illustrative; no measured generation results are implied. The hero is an original AI-generated illustration.
Frequently asked questions
What makes an AI video truly first person?
The camera represents the character’s eye position. Visible body parts, reachable objects, motion, and sound should all agree with that position throughout the shot.
Why does my AI POV video switch to third person?
The prompt or source may contain conflicting viewpoint cues. Use a first-person starting frame, define the camera as the character’s eyes, and remove external camera or orbit instructions.
How do I reduce broken hands in AI POV videos?
Use one simple action, a clear path, and a reachable object. Inspect the contact frame closely and split complex interactions into shorter shots.
Can I build a longer POV story from separate clips?
Yes, but record hands, sleeves, eye height, and object positions for each shot. Review joins carefully and use intentional cuts when exact action continuity is unreliable.