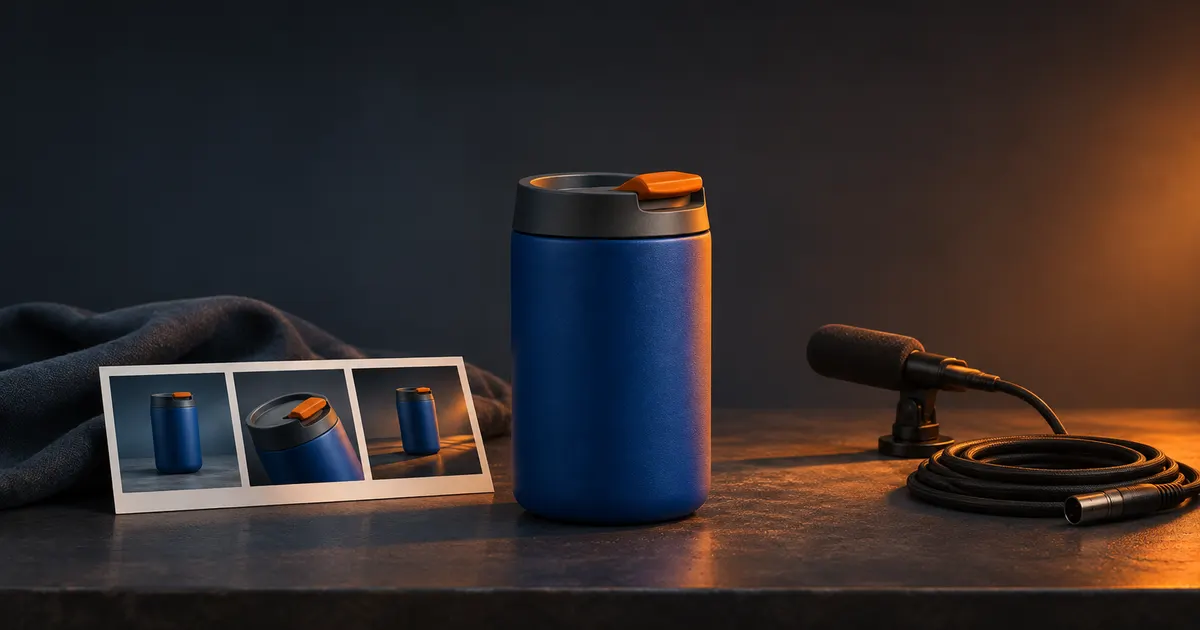

You have a product photo you like. Then the AI video changes the lid halfway through the shot, and the soundtrack covers the last word of your voiceover. Those are different problems. Knowing a few terms helps you fix the right part of the job without starting over.
Here are eight AI terms for creators, explained through a six-second ad for a fictional blue travel tumbler with an orange flip tab. The ad needs a clean product still, a gentle camera move and a voiceover you can hear. The image and diagrams illustrate the brief. The workflow is a practice plan you can adapt to your own product.
1. Reference image
A reference image gives a model visual information to work from. Give each reference a job. A front-facing photo can establish the product’s shape and color. A close-up can clarify how the tab sits on the lid. A lighting reference can show the mood you want without becoming a source for the product design.
Use it when the product keeps changing. Start with one clear image of the tumbler. Ask for warm side light and keep the cobalt body, charcoal lid and orange tab. Before adding another reference, check whether it answers a question the first image cannot. Two images with different lid shapes will make the brief harder to follow.
For a campaign that needs several shots, give the source files descriptive names and record what each one controls. Keep an approved original beside every variation so you can check packaging or color drift. The reference pack workflow shows how to organize those files.
2. Seed
A seed is a number used to initialize a random process during generation. When your tool exposes it, holding the seed steady can make a comparison easier to interpret. Keep the model, source, crop and settings steady too, then change one instruction.
Use it when you want to compare two ideas. Try the same tumbler setup with a soft sidelight, then change only the lighting direction. Record the seed if the tool shows one. If the lighting changes and the product shape also changes, inspect both differences before choosing the version. Different model versions, pipelines or hardware can still produce different outputs with the same seed.
When the tool hides the seed, save the accepted still and your settings. The still gives you a dependable visual source for the next step.
3. Inpainting
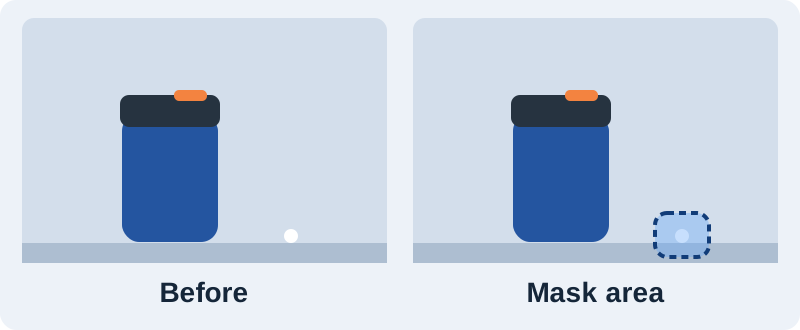
Inpainting regenerates a selected region of an image. The mask identifies the area you want the tool to work on. Use it when you like the rest of the frame and can point to the problem.
Use it when a small area needs repair. Suppose there is a bright speck on the table beside the tumbler. Mask the speck and a little surrounding tabletop. Ask for the same surface and lighting. Leave the lid and the orange tab outside the mask. If the edge of the repair shows, expand slightly into similar texture and compare again. Check the result beside the original because some workflows can change pixels beyond the selected area.
4. Denoise strength
Denoise strength in many diffusion image-to-image workflows controls how much of the starting image can change. With a typical strength control, lower values retain more of the source and higher values allow a bigger departure. Read the tool’s label carefully. A control named “image influence” can use the opposite direction.
Use it when the whole still needs a modest change. If you want to turn cool studio light into warmer evening light, try a restrained setting with the same source image. Compare it with a slightly stronger version. Check the lid outline, surface finish and tab color before choosing. When the update only involves a small reflection, start with a mask so you can keep the experiment local.
5. Keyframe
A keyframe gives a video process a state at a point in time. In a generator that accepts starting and ending images, those images can anchor how a shot opens and closes. In an editor, a keyframe can set a property such as scale, position or music volume at a specific time.
Use it when the ending needs to land somewhere specific. Start with the approved tumbler still and prepare a second, slightly tighter view if your video model supports both frames. Keep the viewing angle, product geometry and lighting compatible. Then describe a slow push-in and ask for a steady final hold. Review the frames between those endpoints. Two clear stills can still produce a wobble in the middle.
When you only need a slow zoom on a still, keyframing scale in an editor gives you predictable movement. Use the first and last frame guide for shots that need generated motion between two images.
6. Temporal consistency
Temporal consistency describes how well visual details stay coherent as a shot plays. A strong opening frame can hide a problem that only appears during motion. The tab may change size for two frames, or the reflection may jump in a way that breaks the apparent camera move.
Check it when the still looks better than the clip. Play the six seconds at normal speed, then scrub the opening, middle and end. Follow one detail at a time. Start with the tab, check the lid seam next and finish with the silhouette. When the object drifts, try reducing the amount of movement or simplifying the action. For a product ad, a quiet shot that preserves the item is often easier to approve than a dramatic move.
7. Native audio
Native audio means the video generation workflow produces sound as part of the clip. Depending on the model and mode, it can include ambience, effects or speech. The result may arrive as a single audio mix. Check the actual clip and your export options before planning on separate tracks.
Use it when a small sound belongs to the action. A gentle tumbler placement might benefit from a soft tabletop tap. Listen for one clear impact that matches the visible contact. If the clip adds a second tap or a voice, mute its audio and place a replacement effect on your timeline. For the optional tap, add a visible placement action to the shot plan. A shot with only a camera push-in can work with quiet room tone.
The product demo sound-effects guide shows how to place a contact sound against the picture.
8. Ducking
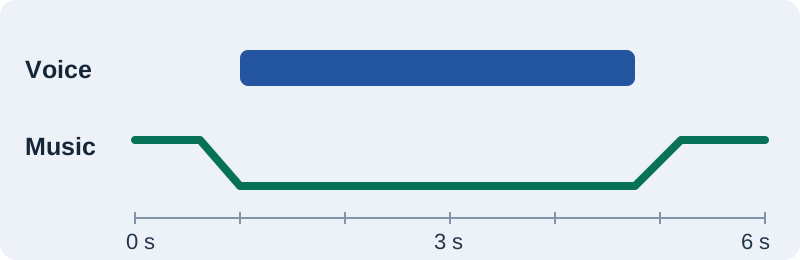
Ducking lowers one audio track while another sound needs attention. In a short ad, the music dips under the voiceover and rises again in the space after the line. You can set the dip by hand with volume keyframes or use an editor’s automatic controls and adjust the result.
Use it when the music competes with the words. In the six-second example, let the voice enter around the first second. Lower the music just before it starts and bring the level back after the final word. Listen to the finished mix on a phone speaker. Pay attention to the first consonant and the end of the line. If the volume rise swallows either one, move the fade or hold the lower level a little longer.
Try the eight terms on one shot
Begin with one approved product photo. Pick a detail that must survive, such as the orange tab. Generate or edit a still with that reference, then compare one setting change. Animate the accepted still with one restrained move. Inspect the middle frame before you spend time on the sound. If you add narration, mix it on its own track so you can adjust the music around it.
Use the sheet to record the source, the one change you made, what drifted, and which version you would approve. The example rows are filled in so you can see what to look for.
Download the six-second shot review sheet (CSV)
How QuestStudio fits the workflow
Use Image Lab to explore the still with a supported model. Once the frame is approved, bring it into Video Lab and check the selected model’s input options before planning an ending image or audio. Keep the accepted still beside the clip so you can compare the product at a glance. Finish with the smallest change that fixes the problem you can see or hear.
Frequently asked questions
Will the same seed always give me the same image?
A seed gives the generator the same starting random state where the tool supports it. The model, inputs, settings, and generation environment can still affect the result. Save the approved image alongside any seed you record.
What is the difference between a reference image and a keyframe?
A reference image guides what the result looks like. A keyframe specifies a state at a particular time. In a video model that accepts a first frame, one image can serve both purposes.
When should I use inpainting or denoise strength?
Use inpainting to target a selected area. In a supported diffusion workflow, denoise strength controls how far an edit can depart from its starting pixels. Some tools let you adjust strength while working inside a mask.
How can I spot temporal inconsistency?
Play the clip at normal speed, then scrub through it. Follow a small detail such as a logo edge, lid seam, or orange tab and look for changes that the motion cannot explain.
What is the difference between native audio and ducking?
Native audio comes out of the video generation workflow. Ducking is a mixing technique that lowers one track while a sound on another track needs to be heard.
Technical references
- Diffusers on seed reproducibility
- Diffusers on image-to-image strength
- Diffusers on masking and inpainting
- Google Cloud on first and last frames
- Adobe on audio ducking
Continue with a useful next step
 Video
AI Product Video Prompts That Keep Packaging Consistent
Use AI product video prompts that preserve packaging, labels, logos, colors, and proportions. Includes templates, failure fixes, and a review checklist.
 Video
AI Video Consistency Explained: Why Faces, Hands, and Backgrounds Break and How to Fix It
Learn why AI video consistency is hard, what causes face and background drift, and how to get more stable results with a better workflow.
 Voice
Background Music Under AI Voiceover: A Mix You Can Hear Clearly
Mix background music under AI voiceover with separate tracks, phrase-based ducking, a practical cue map, and listening checks that beat a fixed volume preset.