

The background looked smooth before a strong curves adjustment. Now it has steps. Should you change the file to 16-bit, export a different format, or start again? The answer depends on which stage discarded the information. I would choose the working precision before the heavy edit and keep the delivery copy separate.
For an image with demanding tonal adjustments or compositing, a higher-precision working master is useful when the editor supports it. A finished web image can still be delivered in an ordinary 8-bit format. Those are two decisions made for different stages of the job.
Bit depth describes values, not image dimensions
An 8-bit channel has 256 possible integer values. A conventional 16-bit integer channel has 65,536. In RGB, “8-bit” usually means eight bits per channel, rather than eight bits for the whole pixel. More representable values can reduce rounding damage while you manipulate tones.
That does not add pixels, sharpen an out-of-focus label, widen a color gamut by itself, or turn an ordinary image into an HDR deliverable. Width, height, color profile, dynamic-range interpretation, and bit depth describe different properties. Check the actual file rather than inferring all of them from one export option.
Adobe's bit-depth documentation describes supported modes and editing tradeoffs. Individual applications can represent and process values differently, so the experiment below uses explicitly defined integer arithmetic rather than claiming to benchmark every editor.
A narrow tonal range makes rounding easy to see
Imagine a synthetic gradient that spans only normalized values 0.45 through 0.55. We quantize it either to 8-bit or to 16-bit integers, then expand that narrow range back across black to white. The operation deliberately exaggerates the loss of intermediate values.
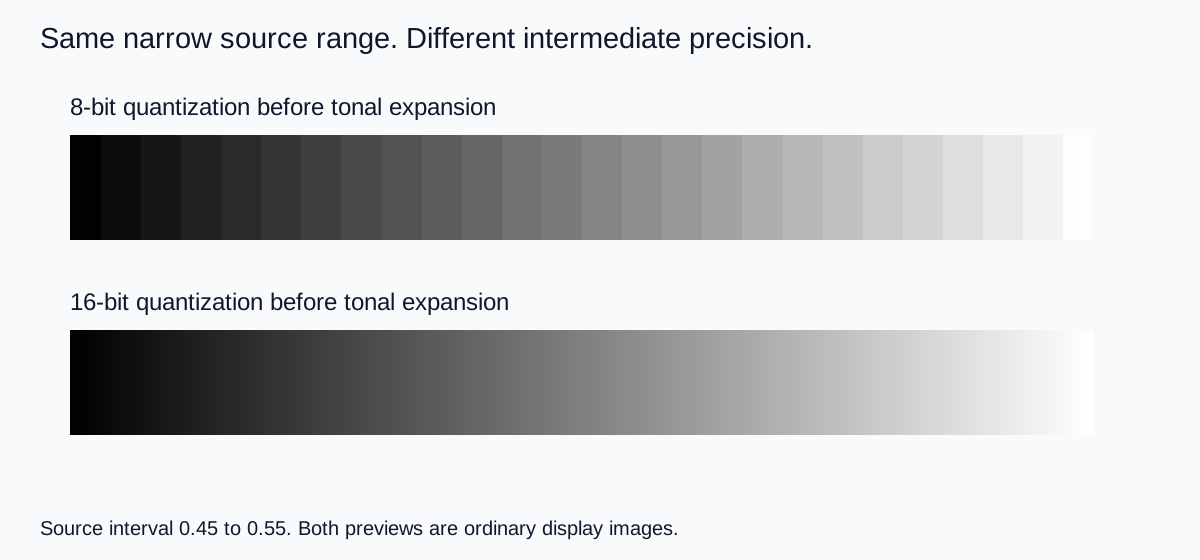
At 8-bit precision, the chosen source interval rounds to values 115 through 140, only 26 distinct codes. Expanding it cannot recover the omitted intermediate tones. The 16-bit path represents many more steps before the expansion. The final preview still has the limits of its browser and display, but it has not inherited those same large gaps.
The sequence matters: round early, then stretch, or keep finer values through the stretch and round for delivery. Download the sample-value worksheet to inspect the calculation. It is a teaching fixture, not evidence that every normal 8-bit photograph will show banding.
Choose the master based on the work remaining
I would prefer a 16-bit working file for substantial curves changes, delicate studio backgrounds, extensive masking, or a composite that needs several stages of tonal matching. Preserve the original source and use adjustment layers where your editor supports them.
For a finished small image that only needs a crop and a restrained resize, an 8-bit workflow can be entirely adequate. Increasing file size without a useful remaining operation does not improve the photograph. Balance the precision requirement with the editor's feature support, storage, and responsiveness.
An 8-bit source can still benefit from higher-precision intermediate editing, because subsequent calculations need not keep rounding to the original small set. But the conversion does not reconstruct the tones already absent from that source. It gives later operations more room; it does not rewrite the capture history.
| Current job | Practical choice | What to verify |
|---|---|---|
| Heavy tonal editing | Higher-precision master | Editor and layer compatibility |
| Simple final crop | Existing adequate file | No new visible artifacts |
| Already damaged gradient | Return to the earliest clean source | Conversion alone is not a repair |
| Small web delivery | Separate optimized export | Actual rendered size and file quality |
Keep the master and delivery decisions separate
Save an editable master before reducing precision or flattening layers for a destination. Give the delivery file a distinct name and record its dimensions, format, and color profile. That prevents an optimized web copy from silently becoming the source for the next campaign revision.
If an effect is unavailable in your chosen mode, make a deliberate branch of the document rather than overwriting the only master. Compare the result before merging it back or accepting the lower-precision branch. A compatible tool is useful only if its output survives the actual edit.
Reopen the exported file. Check a smooth region, a textured region, and a subject edge at the final placement size. A clean editor preview does not establish that the delivery encoding is clean. Likewise, one problematic viewer does not prove the saved pixels are damaged.
The banding troubleshooting guide helps identify the first failed stage when a real image already has visible contours. This article's decision comes earlier: how to preserve useful precision while the master is still being edited.
Use a controlled edit instead of a format contest
Choose one representative image from your project. Duplicate the working version, apply the same meaningful adjustment in each supported mode, and compare the same crop. Avoid creating an extreme edit solely to make one file look bad unless you clearly label it as a stress test.
For a pale product backdrop, the useful question is whether the required exposure or color change remains smooth without destroying texture. Record the adjustment that the brief actually needs. A tiny theoretical advantage is less important than a clean final image and a master you can revise safely.
Do not confuse a larger file with a better result. A layered document can be large because it stores many layers. A lossless format can be larger because of its encoding. Neither observation alone measures visible quality or proves additional source information.
How QuestStudio fits the source-to-master workflow
Create or revise the source composition in Image Lab, then inspect the downloaded file's properties in your editor. Do not assume the selected model delivers a particular bit depth unless the actual output establishes it.
If an edit requires preserving the exact product, retain the approved photograph and finish the composite with masks and color management in an appropriate image editor. Use QuestStudio for a new source or bounded concept variation, rather than claiming it supplies undocumented bit-depth controls.
My recommendation is simple: keep the strongest original, choose working precision for the edits still ahead, and export for the actual destination. The most useful file is the one that survives the next necessary decision without forcing you to rebuild the image.
Frequently asked questions
Does converting an 8-bit image to 16-bit restore lost tones?
No. It can provide finer intermediate precision for later operations, but it cannot recover information already missing from the source.
Must every web image be delivered as 16-bit?
No. Keep a suitable editing master and create a separate delivery file that meets the destination requirements and visual quality target.
Does 16-bit mean higher resolution?
No. Pixel dimensions describe spatial resolution. Bit depth describes the representation of channel values.
Why can a 16-bit preview still look banded?
The source, processing, display path, or preview can introduce limitations. Compare the saved source, master, and final export before blaming the document mode.
Is the original gradient a Photoshop benchmark?
No. It uses explicitly defined quantization and expansion arithmetic. It illustrates operation order, not the exact implementation of a particular editor.
Technical references
Continue with a useful next step
 Image
AI Car Photo Editing for Dealers: Keep the Vehicle, Change the Setting
Edit dealership car photos with AI while preserving the actual vehicle. Plan six views, protect trim and condition, check reflections, and organize listing exports.
 Image
AI Photo Editing vs Image Generation: Choose the Safer Workflow
Decide when to edit a real photo, regenerate a concept, composite verified elements, or retake the source based on truth, control, and risk.
 Image
ChatGPT Couple Photo Editing Prompts: Keep Both Faces
Use ChatGPT couple photo editing prompts without losing either person. Prepare stronger references, lock both identities, guide poses, and repair face drift.
Hero: AI-generated editorial illustration. Supporting diagrams and exercises: QuestStudio.