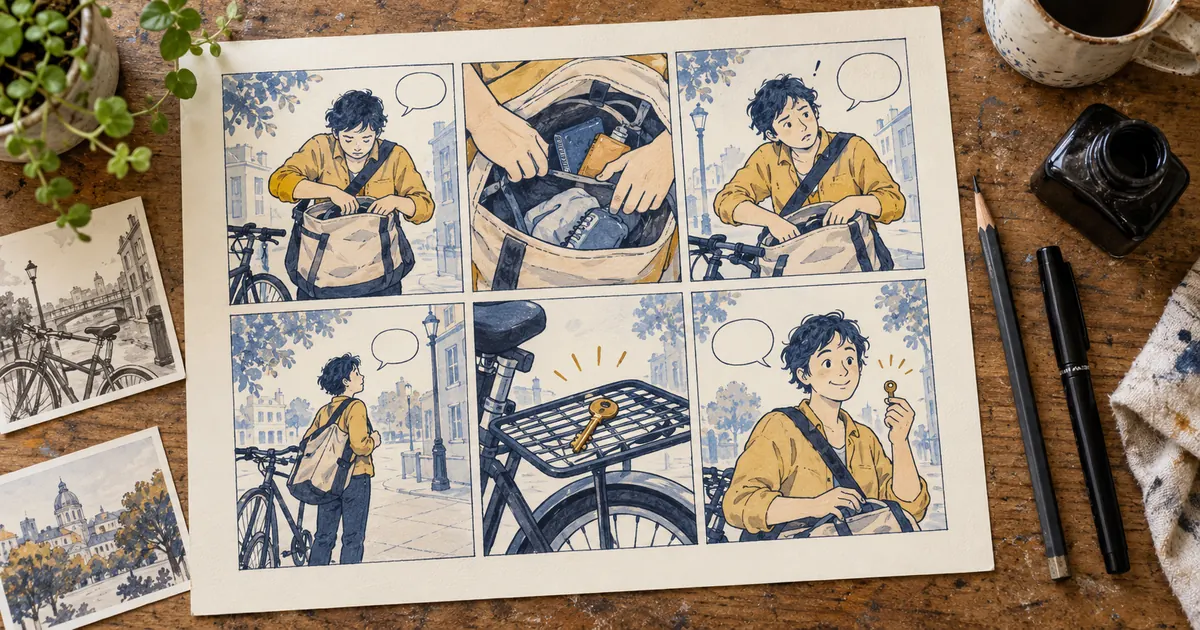

Start an AI comic book by finishing one short page: script the panel sequence, approve a character reference, generate individual panels and add lettering in a layout editor. Review the page as a story before generating the next one. Six attractive images do not automatically create a clear sequence.
This guide uses an original six-panel exercise about a bicycle courier looking for a misplaced key. The script, prop ledger and lettering plan are reusable production aids. The hero is an AI-generated editorial concept, not a tested page produced through every step below or a guarantee of consistent output.
Give the first page a problem small enough to resolve
Choose one character, one location and one visible change. An opening chapter with a large cast, a chase and three locations asks you to solve story, layout and generation consistency at the same time. A small complete page exposes those problems while revisions are still manageable.
Our courier, Niko, reaches a courtyard gate and cannot find the key. A rattle near the bicycle draws attention to the rear rack, where the key has been sitting. Niko retrieves it and relaxes. The page moves from expectation to frustration to discovery. No caption needs to explain a hidden event that the reader never sees.
Write the ending first, then make sure the earlier panels supply the information needed to understand it. If the key appears in a new location without a visual clue, the final image can feel arbitrary. Decide what the reader knows and when before choosing an art model.
Write each panel as one drawable moment
A panel can imply time, but it still needs a clear visual instant. “Niko searches the bag, hears a rattle, turns around and finds the key” is a sequence, not one useful image request. Split those changes into moments that can be read without motion.
| Panel | Visible moment | Text and story job |
|---|---|---|
| 1 | Niko stands beside the bicycle at a closed courtyard gate, reaching for the bag | Caption: One stop left. Establish the goal. |
| 2 | Close view of the open canvas bag; Niko checks the small inner pocket | Thought: Not here. Establish the problem. |
| 3 | Niko pauses and looks toward the rear of the bicycle | Small sound lettering: rattle. Point toward a clue. |
| 4 | A wider view shows Niko turning toward the rear rack | No dialogue. Give the reader a clear change of attention. |
| 5 | Close view of the brass key resting on the rear rack | No dialogue. Deliver the discovery. |
| 6 | Niko holds the key and smiles beside the same bicycle | Dialogue: Found you. Resolve the small problem. |
The example lettering is deliberately sparse. You can change it, but keep the story understandable when the text is hidden. Do not ask the image model to supply the final words; reserve space and add them as editable lettering later.
Plan the page grid before making final artwork
For this exercise, use two rows of three panels with consistent gutters. In a left-to-right reading format, the order should be obvious without arrows. This is a training constraint, not a claim that every comic should use a regular grid.
Sketch six empty rectangles at the intended page proportion. Place rough shapes for the character, bicycle and word balloons. Check whether the close-ups in panels two and five will still make sense beside the wider shots. A close-up is useful when the reader already knows where to look.
Keep a little room around the key in panel five so the crop can emphasize it. If every panel has the same camera distance, the discovery may feel no more important than the setup. Conversely, too many extreme angles make a simple location difficult to understand.
Decide the output destination now. A print page, a web page and a vertical scrolling comic have different layout needs. Finish this version for one destination before rearranging it into another. Save the layout with editable panels rather than flattening everything early.
Create a reference you can compare across views
Give Niko a small set of visible identity features: short dark wavy hair, a mustard overshirt, dark trousers and a plain tan canvas shoulder bag. Keep the design simple enough that you can identify what changed between outputs. Avoid relying on a character name to communicate the appearance.
Approve one reference and, if needed, a small set of consistent alternate views. In an image-capable workflow, attach the relevant approved reference when generating a new panel. Check the selected model's input support instead of assuming every model accepts the same number or type of references.
Comicory’s consistency guide demonstrates why different camera angles and targeted repairs need review even with a saved character. For a deeper reference setup, use our character consistency workflow alongside this page exercise.
Track the props and location as carefully as the face
A reader may accept small drawing variation while still becoming confused by a bag that swaps shoulders or a key that moves before the character finds it. Write down the scene state that matters to the story.
| Element | Keep fixed | Allowed story change |
|---|---|---|
| Niko | Hair, outfit colors and bag design | Expression changes from concern to relief |
| Canvas bag | Same strap placement and size | Closed in panel 1, opened for the search |
| Bicycle | Same frame color, rear rack and position by the gate | Niko turns toward it; the bicycle remains parked |
| Brass key | One key with a simple round bow | On rear rack until panel 5, held in panel 6 |
| Courtyard | Same gate and light direction | Camera distance and crop may change |
Do not make every background detail equally important. Focus the ledger on facts that tell the reader who is acting and what happened. A decorative brick can vary without breaking the story; an extra key in the bag contradicts the central problem.
Keep the approved reference and ledger beside the page while reviewing. A prompt full of preservation instructions can still produce an incorrect result. Approval comes from comparing the output, not from trusting that the instruction was followed.
Generate panels in an order that reduces uncertainty
Start with a panel that establishes the character, bicycle and location clearly, such as panel one. Then test the character close enough to inspect the face and outfit. Approve those visual anchors before making every reaction and detail shot.
For each panel, specify the visible action, framing and reserved lettering area. Keep the stable character description separate from the scene instruction. A panel-five request should concentrate on the key and rack, not reintroduce the entire backstory.
This is a planning prompt requiring your approved scene reference, so it is not sent directly to a generation tool from this article. Attach the actual reference in a supported mode and adapt the crop to your layout.
Save the accepted panel with its prompt, reference filenames and revision number. Replace one failed panel at a time unless the shared character design or location is wrong. Rebuilding the whole page to fix a small prop can introduce new mismatches into panels you already approved.
Add lettering after the story reads without it
Place the art into your layout editor and hide all text. Ask someone to describe what happens. If they cannot connect the empty-bag search with the key on the rack, adjust the sequence or framing before polishing the balloons.
Add the exact dialogue as editable text. Put balloons in the reading order, keep tails aimed clearly and leave enough space around the words. Avoid covering the hand, key or facial expression that carries the panel's meaning. Test the page at its intended display size rather than relying on a zoomed-in canvas.
Use a font you are authorized to use for the intended publication. Keep capitalization, punctuation and balloon treatment consistent. The small “rattle” in panel three is an intentional sound cue; it should help locate the discovery, not compete with the character's reaction.
For print, obtain the printer's current page, trim and safe-area requirements before exporting. For a web version, check legibility on a phone and provide an accessible text description of the sequence where your publishing format allows it.
How QuestStudio helps with the page assets
Use Character Forge to explore the original character and Image Lab for supported reference-based panel generation. Review the available model inputs before relying on a particular reference workflow.
Keep final page composition, editable speech balloons and publication export in your layout application. This process does not assume QuestStudio automatically writes, letters and exports a complete comic book. The storyboard guide is useful when you later adapt the story into moving shots, but a comic page needs its own reading-order review.
Download the six-panel ledger (CSV)
The download includes the original story beats, prop states and blank review fields. Replace the sample with your own small story and keep the same discipline: each panel should change what the reader knows.
Frequently asked questions
Can I make a whole AI comic book in one prompt?
A single prompt can produce a concept, but a readable book needs control over the script, panel sequence, recurring characters, lettering and revisions. Finish a small page before scaling up.
How do I keep AI comic characters consistent?
Approve a clear reference, keep visible identity features stable and use supported reference inputs for new panels. Compare each output across camera angles; references do not guarantee a perfect match.
Should I generate the whole page or individual panels?
A whole-page draft can help explore composition. Individual panels make it easier to inspect important details and replace a failed image without regenerating the entire page.
Why should I add the speech bubbles in an editor?
Editable lettering lets you correct wording, change line breaks, move balloons and preserve reading order without asking the image model to redraw the art.
How do I know when the first page is ready?
Check that someone can follow the sequence, the important character and prop states agree, and the lettering is readable at the final size. Review the actual export as well as the editable project.
Make one page worth turning
A clear setup, a visible clue and a satisfying small payoff are enough for the first exercise. Finish that page, save the decisions that worked, and let the next page build on an approved foundation.