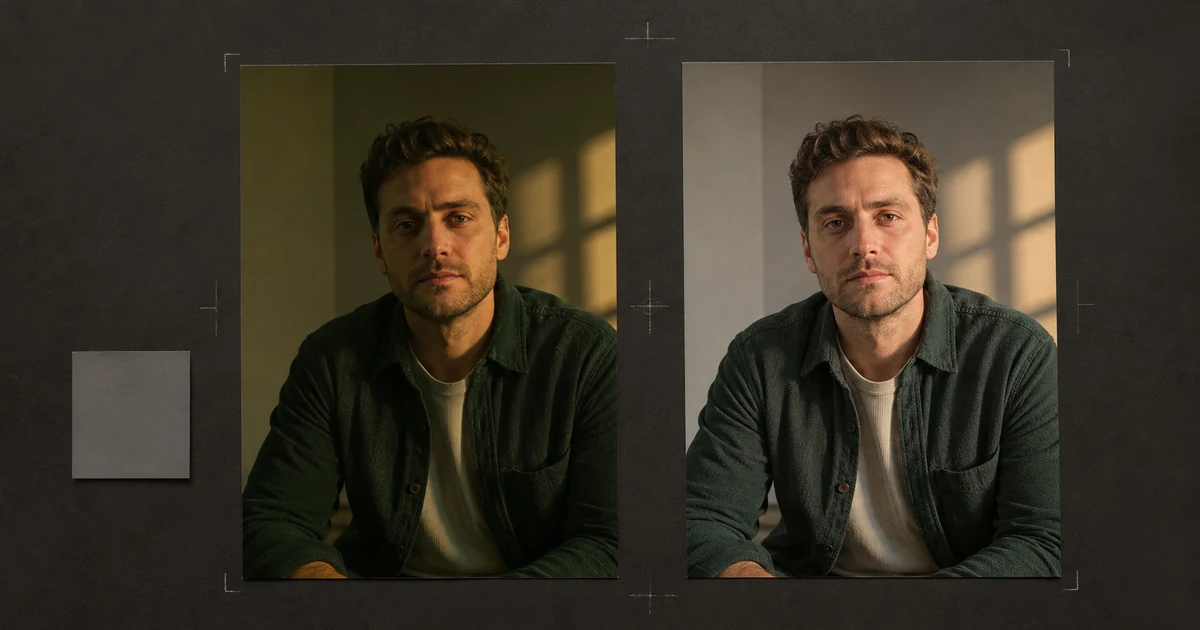

Fixing bad lighting in a photo with AI is not the same as asking for “better lighting.” That vague request lets a generative editor repaint the face, flatten skin, replace product texture, move shadows, or turn an ordinary room into a cinematic scene. A reliable correction begins with a diagnosis, a preservation list, one bounded change, and a side-by-side review.
OpenAI's current image-editing guidance supports uploading an existing image and describing a change, including a selected area. It also warns that an edit may extend beyond the selection. Treat every generated result as a new image that needs a complete review, even when you masked only a cheek, window, or corner.
Quick answer
Keep the untouched original. Identify whether the failure is global exposure, a local shadow, clipped highlights, mixed color temperature, flat contrast, or low-light noise. Lock the subject, geometry, materials, background, crop, and original light direction. Correct one problem, compare the whole output at equal size, and reject any invented identity or scene detail.
Diagnose the light before writing the prompt
“Too dark” can describe several different failures. An underexposed frame may need a modest global lift. A backlit portrait may need local face exposure while the bright background stays controlled. Mixed window and tungsten light needs color separation, not more brightness. Hard noon sun creates directional face shadows; lifting the entire image will wash out the sky before it fixes the eyes.
| Problem | Visible evidence | Correction goal |
|---|---|---|
| Underexposure | Most midtones are dark but edges and color remain visible | Lift exposure and shadows without turning blacks gray |
| Backlight | Background is readable while the subject is silhouetted | Open the subject locally and protect highlights |
| Mixed color | Window side looks blue while lamp side looks orange or green | Neutralize casts by region while preserving real material colors |
| Clipping | White areas have no texture or shadows are featureless black | Recover only recorded detail; do not invent evidence |
| Low-light noise | Grain and colored speckles appear when shadows are lifted | Use restrained denoising without waxy skin or smeared edges |
Know what correction cannot recover
If a shirt is pure black with no folds or a window is pure white with no frame detail, the file may not contain the missing information. AI can draw something plausible there, but plausible is not recovered. That difference matters for products, property listings, events, journalism, evidence, and any image where factual details affect a decision.
Adobe's current Light adjustment documentation separates exposure, highlights, shadows, whites, and blacks and recommends a nondestructive adjustment layer. Try that kind of tonal correction first when the source already contains the needed detail. Use a generative edit when the job truly requires spatial relighting, and label reconstruction honestly when it creates new pixels.
Write a preserve-and-correct brief
Before prompting, list what makes the photo true. For a person, lock face shape, eye spacing, skin tone, expression, hairline, age, body proportions, clothing, pose, and hand position. For a product, lock silhouette, dimensions, label text, finish, seams, reflections, and packaging color. For a room, lock walls, windows, fixtures, furniture, perspective, and floor lines.
Preserve
Identity, geometry, factual detail, materials, camera angle, crop, background, and existing object positions.
Correct
One named region and one lighting variable: exposure, cast, shadow softness, highlight intensity, or noise.
Reject
Face drift, changed text, fake texture, new reflections, HDR halos, inconsistent shadows, clipped color, or plastic skin.
Use this bounded lighting-correction prompt
Replace each bracket with observable instructions. Do not ask for a mood until the neutral correction passes.
The useful words are not “professional” or “4K.” They are the named failure, region, boundary, and rejection conditions. The camera lighting prompt generator can help describe direction and softness, but your source remains the authority.
Six prompts for common lighting failures
1. Brighten a backlit face
2. Correct a dim indoor photo
3. Neutralize mixed window and lamp color
4. Soften harsh midday face shadows
5. Protect a bright window
6. Even a product photo
Correct one system per pass
Start with exposure, then color, then noise, and only then a local polish if it is still necessary. Saving each accepted pass gives you a trustworthy rollback point. Asking for brighter shadows, warmer skin, softer light, cleaner noise, a new background, and a sharper face in one instruction makes it impossible to know which change caused drift.
When a single cheek or corner needs work, select that region but repeat the global preservation rules. The image-to-image workflow explains the same source-first principle across broader edits.
Audit the correction at the same crop
Place the original and result side by side at equal size. First check identity or object truth. Then compare background geometry, edges, text, reflections, shadow direction, and contact points. Finally inspect the corrected region at full resolution and at the actual destination size. A face that looks acceptable in a large preview may look waxy in a profile crop; a product label that seems intact may fail on a store card.
| Review pass | Approve when | Reject when |
|---|---|---|
| Truth | Face, text, materials, geometry, and scene facts match the source | The edit replaces identity, redraws a label, or invents missing evidence |
| Light | Exposure and color improve while direction and contact shadows agree | Highlights glow, shadows point differently, or the subject appears pasted in |
| Texture | Skin, hair, fabric, wood, metal, and noise remain believable | Skin becomes plastic, edges smear, or microtexture repeats |
| Destination | The final crop, compression, and display size still pass | Banding, halos, noise, or altered details appear at delivery size |
Adobe's local-adjustment guide notes that opening shadows can reveal luminance noise. That is why noise review belongs after exposure correction, not before it.
Know when not to use generative relighting
Use a nondestructive exposure, curves, white-balance, or local-mask adjustment when the file already contains the detail and factual fidelity matters. Reshoot when a product color must be exact, a face is motion-blurred, the important region is clipped, or inconsistent lighting across a catalog would take more repair time than a controlled setup.
Generative relighting is most defensible when you have the original, permission to edit it, a narrow visual goal, and an acceptance test. The AI headshot quality checklist adds a deeper identity review for professional portraits.
Test one controlled correction in QuestStudio
Bring the same source, diagnosis, preservation map, and rejection rules into QuestStudio. Open Nano Banana Pro 4K in Image Lab and attempt one bounded lighting correction. Count success only when the output remains truthful and usable—not merely when a generation finishes.
Frequently asked questions
Can AI fix bad lighting in a photo?
AI can often rebalance exposure, reduce a color cast, soften a harsh shadow, or make a dim subject easier to see. It cannot truthfully recover detail that the camera never captured, and a generative edit may invent texture or change the subject. Keep the original and compare the entire result.
What prompt should I use to fix photo lighting?
Name the exact failure, the affected region, and the intended correction. Then lock identity, geometry, materials, background, crop, and light direction. Ask for one change, such as neutralizing a green cast on the face, rather than requesting better or cinematic lighting.
How do I brighten a face without changing it?
Request a local exposure and color correction on the face while preserving face shape, eye spacing, skin tone, expression, pores, hairline, shadows, and every surrounding element. Reject any result that smooths skin, redraws features, whitens teeth, or changes apparent age.
Can AI recover blown highlights or black shadows?
Only when useful information remains in the source. Pure white clipping and featureless black areas contain little or no recoverable detail. AI may create plausible replacement content, but that is reconstruction rather than recovery and should not be treated as documentary truth.
Why does a brightened photo look noisy or fake?
Lifting dark areas reveals sensor noise, compression, color speckles, and weak detail. Excess denoising then creates waxy skin and smeared texture. Use the smallest useful shadow lift, apply restrained noise reduction, and review faces, hair, fabric, edges, and fine text at full size.