
For a first Photoshop project, make one product graphic with a recoverable layer structure, then save an editable master separately from the delivery image. Learn to select, move, hide and organize the pieces before adding complex effects.
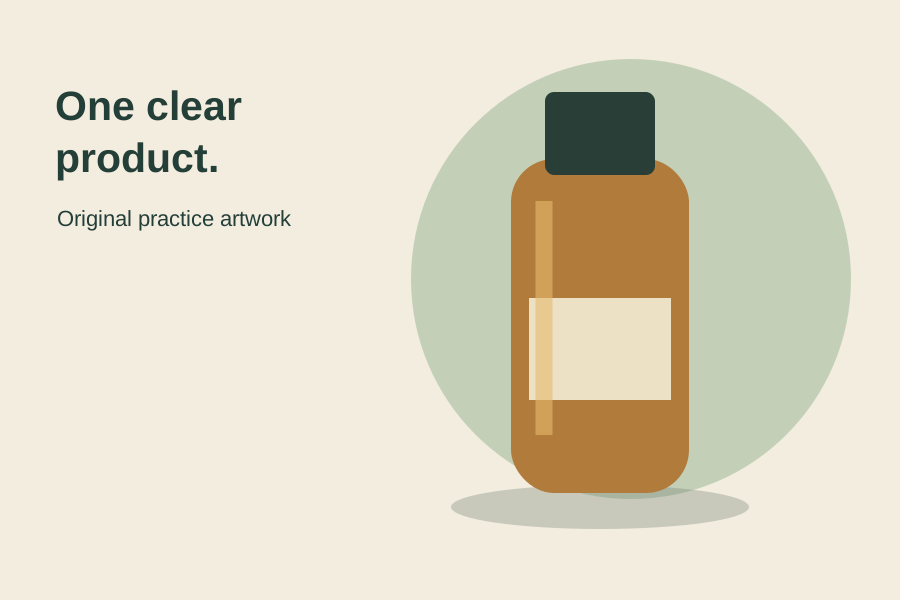
This exercise uses an original 900 by 600 pixel product composition. You can inspect its five-layer PSD and editable SVG source, then rebuild or adapt the layout in Photoshop. The project file was authored programmatically and checked with independent image-reading tools. The Photoshop interface steps below follow Adobe's documentation; we did not run this project through the native Photoshop app for this article.
The project and its five parts
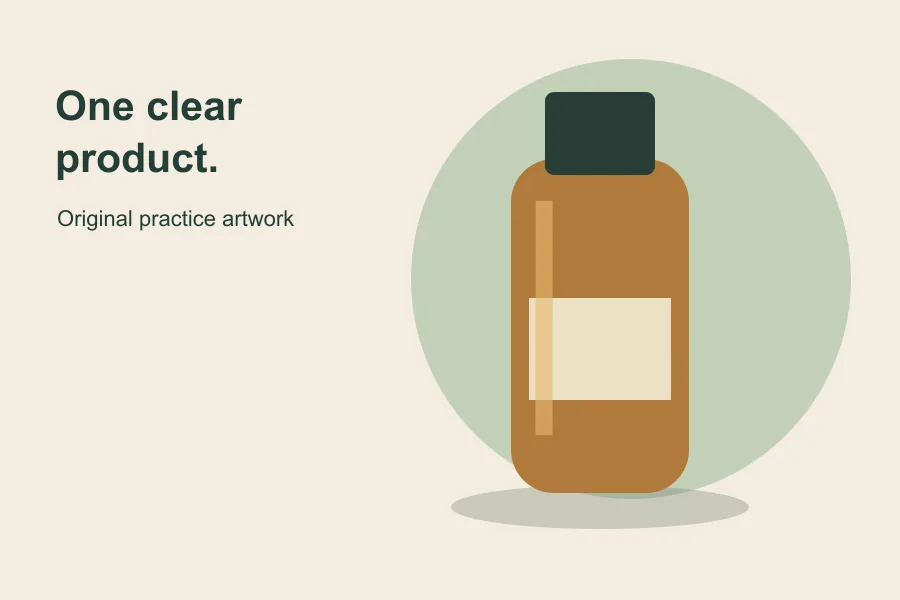
Download the layered product practice ZIP. It contains the PSD, an SVG source and a readme explaining the file structure. The separate SVG source is useful if you want to inspect the original shapes and text outside Photoshop.
The five PSD layers are Background, Accent, Contact shadow, Product illustration and Caption - pixel example. They are pixel layers. In particular, the caption is not a live Photoshop Type layer. You can move or hide it, but to edit its wording in Photoshop, hide the example and create your own text layer.
That distinction matters for a beginner. A layer can be separately editable in position and visibility without every word or shape remaining a native vector or Type object. Inspect the actual layer type instead of assuming that “layered PSD” promises every possible editing control.
Open a copy and find the layer you mean
Keep the downloaded original and work on a copy with a new name. Open the PSD, then locate the Layers panel. If your workspace looks different from a tutorial, use the application's current panel controls rather than searching for a pixel-perfect match to an old screenshot.
Adobe's graphic design basics tutorial demonstrates layer order, visibility, moving content and saving a layered Photoshop document. The principle is simple: select the layer you intend to change before acting. A successful move on the wrong layer is still the wrong edit.
Toggle the Accent layer's visibility and observe which shape disappears. Restore it, then do the same with Contact shadow. This is a useful first inspection because it connects a name in the panel with the actual content on the canvas.
Understand stacking order before changing the design
| Layer | Purpose | Beginner check |
|---|---|---|
| Caption - pixel example | A movable example caption above the background | Hide it before adding replacement live text |
| Product illustration | The complete bottle artwork | Preserve its full outline and proportions |
| Contact shadow | A separate grounding shadow | Keep it aligned beneath the bottle |
| Accent | The colored background shape | Keep it behind the product |
| Background | The base canvas color | Avoid accidentally moving it during object edits |
Layer order controls what covers what. If a large opaque accent moves above the bottle, it can hide the product without deleting it. Before undoing several steps or rebuilding the file, inspect the layer order and visibility. A missing object is sometimes simply behind another layer.
Rename new layers by purpose. “Alternate headline” or “New background” is easier to review than several unnamed copies. If you duplicate a layer as an experiment, identify the version you intend to keep and hide the unused one. Adobe documents creating, naming and grouping layers separately.
Move the bottle without distorting it
Select Product illustration and use the Move tool to reposition it slightly. Move Contact shadow by the corresponding amount so the bottle still appears grounded. If you change the scale, preserve the intended proportions and check the preview rather than stretching the bottle to fill an arbitrary gap.
For this first exercise, keep the complete cap and base inside the canvas. Leave a clear margin. A tight crop can create a dramatic graphic, but it fails an assignment that requires the complete product. State the requirement before judging whether the result looks polished.
The practice bottle is an illustration. For a real product, use an approved photograph or cutout and compare the final image with the source. This tutorial does not establish that generated or edited packaging will retain accurate labels automatically.
Replace the example with live text
Hide Caption - pixel example. Use the Horizontal Type tool to click on the canvas and add a short headline on a new text layer, following Adobe's text layer instructions. Keep the text readable at the final delivery size and place it in the available space rather than across the product.
Use one clear hierarchy: a short headline and, if necessary, a smaller supporting line. Check contrast against the actual background. A thin pale caption may look elegant while zoomed in and become unreadable in a small social preview.
Do not add a factual benefit just to fill the empty space. “One clear product” is a practice caption. A real campaign needs owner-approved wording. Claims about ingredients, performance, certification or price require their own factual source.
Keep experiments reversible
Before a larger change, save a new working version. If you are practicing a cutout or mask, retain an untouched source layer. Learn the difference between hiding pixels with a mask and permanently removing them before applying a destructive edit to your only copy.
Limit this exercise to a few controlled changes: move the product, adjust the accent and replace the caption. That is enough to learn the layer relationships. Adding many effects at once makes it harder to understand which step created a problem.
If a result looks wrong, check the selected layer, visibility, stacking order and recent transform first. Work through those concrete causes before assuming the application or source file is broken.
Save the master, then export the delivery
Adobe's saving tutorial describes preserving the layered PSD and making a separate shareable copy. Use the current Save As controls to preserve your editable PSD master. Check the format and layer option in the dialog instead of relying only on the filename you typed.
Create a separate delivery image using the current export controls and the format required by your destination. The flattened preview is appropriate for viewing, but it is not a substitute for the layered master. Open the exported file and inspect the edges, caption, full product and dimensions.
This source exercise is 900 by 600 pixels. That size is sufficient for practicing the relationships in the layout; it is not a universal print or advertising specification. For a client delivery, obtain the required dimensions, crop and color requirements before building the final artwork.
What was checked in this practice file
The PSD was parsed to verify its canvas size and five named layers. Its composite was rendered and independently opened as an image, with the rendered composition checked against the source artwork. The ZIP was inspected for the expected files. These checks support the downloadable file's structure and preview, not a claim of native Photoshop execution.
After opening your copy, inspect the same relationships yourself. If your application reports a compatibility issue, preserve the original, record the version and try the SVG source or rebuild the simple layout from its parts. Do not overwrite the only master while troubleshooting.
For the next skill, our Photoshop Harmonize product guide addresses a more specific compositing task. Use Editor Lab for supported composition work in QuestStudio, checking its current controls. A layered PSD and an editor's own project state are different formats; do not assume a native PSD import feature unless the tool explicitly offers it.
Frequently asked questions
What is the first Photoshop skill to learn for this project?
Connect each visible object with its layer, then practice selection, visibility, order and movement. Save an editable master before making more complex changes.
Is the caption editable as Photoshop text in the download?
No. The supplied caption is a separate pixel layer. Hide it and create a new Type layer to edit the wording in Photoshop. The SVG source also retains its original vector and text description.
Was this PSD tested inside Photoshop?
No. It was authored programmatically, parsed for layer structure and independently rendered and opened as an image. The interface instructions follow Adobe documentation, and no native Photoshop run is claimed.
Should I keep a PSD and an exported image?
Yes. Keep the layered PSD as the working master and create a separate delivery image for viewing or publication. Inspect the exported file for dimensions, crop, text and product visibility.
Can I use the practice dimensions for every project?
No. The exercise is 900 by 600 pixels. Obtain the actual destination's dimensions, crop and color requirements before preparing a final client, print or advertising delivery.
Prepare a source image for the layout
Use the available Editor Lab controls for a focused source correction, then keep the layered design and delivery export as separate files.