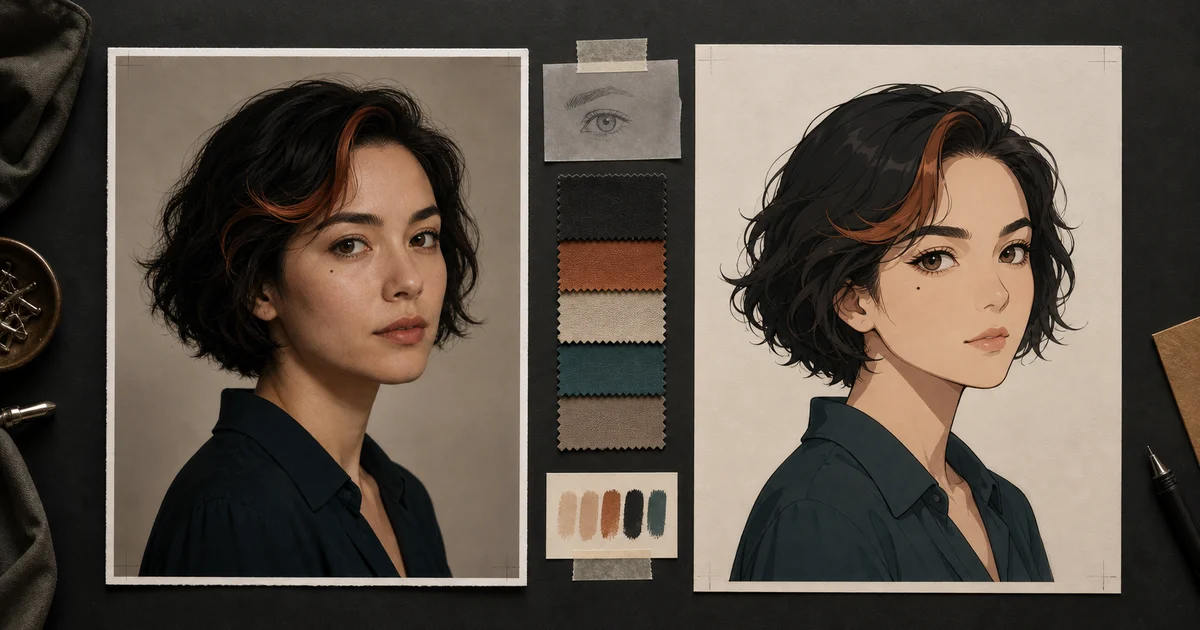

An AI anime generator from photo works best when you separate two decisions: what must remain recognizably true about the person and what should change about the rendering. If you only ask for “anime style,” the model may enlarge the eyes, narrow the jaw, replace the nose, smooth away distinctive marks, and produce an attractive stranger.
The goal is not pixel-perfect facial reproduction. Stylization necessarily simplifies. The goal is controlled translation: preserve the few relationships that make the person recognizable while choosing an original visual language for line, shape, color, shading, and background. That requires a good source photo, an identity checklist, one controlled style direction, and an honest comparison before download.
Quick answer
Use a sharp, evenly lit head-and-shoulders photo you have permission to transform. Record face shape, eye spacing, brows, nose, mouth, hairline, hairstyle silhouette, distinctive marks, expression, head angle, and clothing colors. Ask the model to preserve those anchors while changing only linework, shading, palette, and background treatment. Compare at the same crop, repair one drifting region, and export only after the original person can recognize the result without being told what to look for.
Start with a photo that reveals the face
A model cannot preserve information the reference hides. Choose one high-resolution image with the face large enough to inspect, natural perspective, soft even light, and both eyes visible. A front or gentle three-quarter view is easier than a dramatic profile. Keep the camera near eye level and avoid wide-angle selfies that enlarge the center of the face.
Remove the problems you can control before generating: beauty filters, motion blur, harsh colored light, deep eye shadow, reflective glasses, hair covering facial landmarks, hands crossing the jaw, and a busy background. Do not “improve” the person first. Skin texture, natural asymmetry, a distinctive eyebrow, or a small mark may carry more recognition than a generic polished face.
Use
Sharp eyes, even light, natural lens perspective, visible hairline, simple background, and an expression you want to keep.
Avoid
Heavy filters, tiny faces, deep shadow, extreme angle, glare, compression artifacts, cropped hair, and overlapping objects.
Write an identity lock before a style prompt
Describe observable relationships, not compliments. “Beautiful face” and “same person” are weak instructions. “Soft square jaw, close-set almond eyes, straight brows with a higher right arch, narrow nose bridge, fuller lower lip, chin-length waves, and one copper streak at the front” gives the model and reviewer something visible to compare.
Separate permanent anchors from temporary styling. Face geometry, eye spacing, hairline, and distinctive marks usually belong in the preserve list. Clothing, background, color treatment, line weight, and shading belong in the change list. Expression and hairstyle can go in either list depending on the purpose. If recognition is the main goal, preserve them during the first round and change them later.
Keep the lock short enough to repeat exactly. Six to ten identity cues are usually more useful than a paragraph mixing anatomy, mood, wardrobe, story, camera, and aesthetics.
Describe anime with visible traits, not a famous name
“Anime” covers many visual systems. Choose specific traits: fine or bold linework, realistic or simplified proportions, one- or two-step cel shading, muted or saturated color, sharp or soft shadow edges, restrained or exaggerated eyes, detailed or minimal background, and a contemporary or retro production feel.
Avoid asking for a named artist, studio, franchise, or existing character. Apart from the creative and rights concerns, names are imprecise production instructions. Observable features tell you what to adjust when the result fails. “Clean tapered ink lines, restrained eye enlargement, two-step cel shading, muted teal and copper palette, soft paper texture” is more controllable than “make it look exactly like” somebody else’s work.
Use a preserve/change prompt
Upload only the authorized reference, then give the transformation a narrow job. Use this template as a starting point and replace every bracket with facts you can verify in the photo.
Ask for one portrait, not a collage of styles. A single result at a consistent crop is easier to audit. Save the source, prompt, model, settings, and output together so the process can be repeated.
Change stylization strength one step at a time
Make three versions with the identity lock, crop, expression, and palette fixed. Change only the degree of simplification: restrained, moderate, and expressive. Do not simultaneously change pose, wardrobe, background, lighting, and facial proportions. If the restrained version already loses the person, a stronger version will not restore them.
Choose the lowest stylization level that delivers the intended illustration while keeping the identity relationships. More dramatic is not automatically better. A profile image for friends may tolerate more exaggeration; a creator avatar, memorial portrait, team graphic, or client commission may require a closer match.
Audit the face with a fixed comparison map
Place the reference and output at the same crop and size. Alternate between them rather than relying on memory. Review from large structures to small details; polishing eyelashes cannot rescue a changed jaw or shifted eye spacing.
| Region | Compare | Common drift | Repair instruction |
|---|---|---|---|
| Silhouette | Face width, jaw, chin, hair mass | Generic narrow jaw or enlarged hair | Restore the original outer contour and head-to-hair ratio |
| Eyes and brows | Spacing, tilt, lid shape, brow angle | Oversized matching eyes and flat brows | Preserve measured spacing and natural asymmetry; reduce enlargement |
| Center face | Nose bridge, tip, cheek relationship | Nose erased into a dot or face flattened | Restore the visible bridge length and cheek structure |
| Mouth and chin | Lip width, upper/lower balance, distance to chin | Default small mouth or shortened lower face | Match the original mouth width and vertical spacing |
| Identity markers | Hairline, streak, freckles, glasses, marks | Moved, removed, duplicated, or beautified | Restore only the verified marker at its original position |
Also ask the person depicted, when appropriate: “Does this feel recognizably like you?” Do not prime them with the feature list first. Their immediate response is useful evidence, even though no single opinion is a scientific identity score.
Repair one region instead of restarting
If the output is close, name the failing region and keep everything else locked: “Restore the original eyebrow angle and eye spacing; keep the illustration style, crop, hair, clothing, palette, and background unchanged.” One-region edits are easier to judge and less likely to create a new stranger.
If several regions drifted, return to the restrained version. Reduce stylization, shorten the scene request, and remove conflicting adjectives. When glasses matter, use a reference without glare and verify frame shape and eye visibility. When hair carries recognition, preserve the outer silhouette, part, curl pattern, length, and one or two high-value color cues rather than describing every strand.
Hands are outside the core portrait job. Keep them out of frame during identity approval, then add a pose in a later step. The same applies to elaborate costumes and cinematic backgrounds: approve the person first.
Use only photos you are allowed to transform
Use your own photo, a properly licensed image, or a photo whose subject and owner have authorized the transformation. Finding an image online is not permission. Do not upload a stranger, celebrity, client, employee, or family member and assume a playful style makes consent unnecessary.
For public or commercial use, document the source, permission, intended destinations, and approval. Be especially careful with minors and sensitive contexts. Review the current provider terms and privacy choices before uploading a likeness. The AI commercial rights checklist provides a broader production record, but it is not legal advice.
Export for the actual destination
For a profile image, preview the final crop inside a circle and at the platform’s displayed size. Keep the eyes and distinctive hair inside the safe area. For print, start with enough source resolution, inspect edges and gradients at full size, and confirm the printer’s dimensions and file requirements before export.
Keep the original authorized photo, selected output, prompt, model, date, edits, and approval together. If you need multiple scenes of the same fictional character after the portrait is approved, switch to the character turnaround-sheet workflow. That is a different job from translating one person into one anime portrait.
Create the first controlled transformation in QuestStudio
Use Image Lab with one strong reference, one preserve list, and one observable style direction. Keep the first generation shoulder-up and uncomplicated. For the general mechanics of reference strength and preserve/change prompts, read the image-to-image AI guide.
Open Nano Banana Pro 4K in Image Lab and create one restrained anime interpretation before exploring stronger variations.
Frequently asked questions
How do I make an anime portrait that still looks like the person?
Start with a sharp, evenly lit reference and list the features that carry recognition: face shape, eye spacing, brows, nose, mouth, hairline, hairstyle silhouette, distinctive marks, expression, and head angle. Tell the model to preserve those features and change only the rendering style.
What kind of photo works best for an AI anime generator?
Use one high-resolution head-and-shoulders photo with natural perspective, soft even light, visible facial landmarks, minimal beauty filtering, and little obstruction from hair, hands, glasses glare, or deep shadow. A neutral or simple background makes comparison easier.
Why does my AI anime portrait look like a different person?
The style request may be overpowering the identity reference, or too many variables may be changing at once. Reduce stylization, restore the original crop and head angle, repeat the identity locks, and repair one facial region instead of regenerating everything.
Should I ask for the style of a specific anime studio or artist?
A safer and more controllable approach is to describe observable traits such as line weight, cel-shading depth, color restraint, eye proportions, background treatment, and era cues. This produces clearer direction without asking to imitate a named creator, studio, franchise, or character.
Can I use someone else’s photo in an AI anime generator?
Use photos you created, licensed, or have permission to transform. Do not assume that finding an image online grants permission, and obtain appropriate consent before uploading another person’s likeness, especially for public or commercial use.