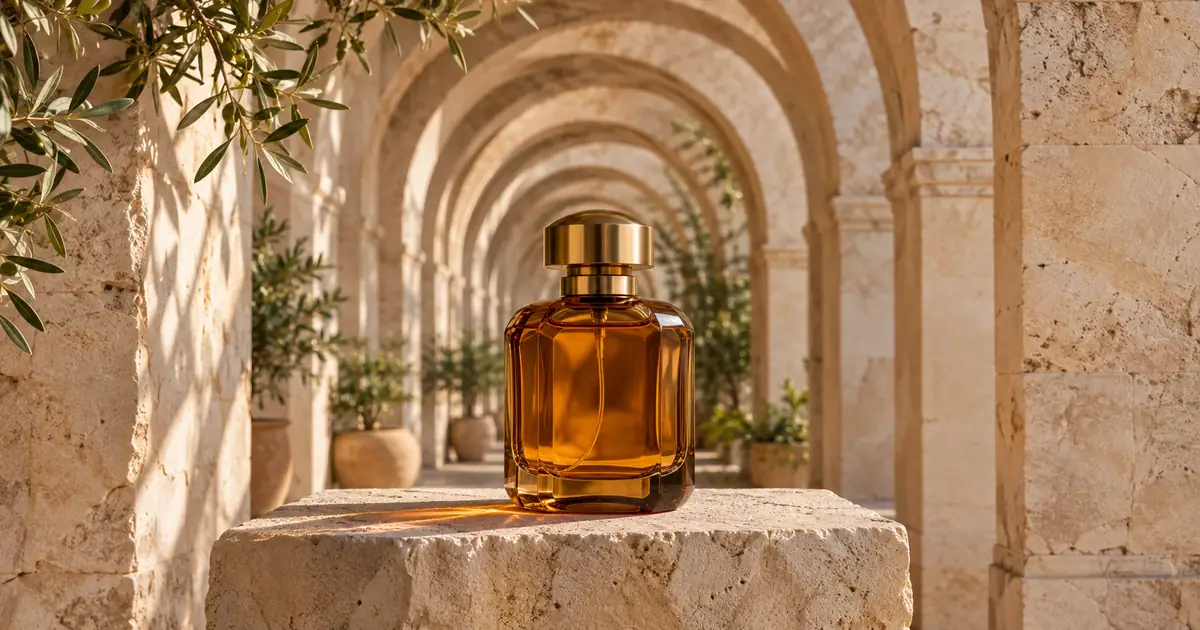

A bottle can occupy exactly the same amount of a photograph while the room behind it looks completely different. In one frame, the background feels distant and spacious. In another, the backdrop seems to sit just behind the product. That change is the useful part of lens compression for a creator: it changes the relationship between the subject and its surroundings.
I recommend deciding how much of the setting you want before choosing a focal-length label. A longer lens can help frame a distant viewpoint, but buying one is not the first step. You can learn the effect with a phone, two objects, and enough room to move backward.
Camera position changes perspective
Lens compression is the familiar description for background objects appearing larger relative to a foreground subject when you photograph from farther away. The important variable is the viewpoint. Fujifilm's explanation of lens compression makes the same distinction: camera position produces the perspective relationship, while focal length helps you frame it.
Two actions often happen together, which makes the cause easy to confuse. You step back, making the subject smaller in the picture. You then zoom in, restoring its size. Moving changes the relative distances to the subject and background; zooming changes the framing. If you only zoom while standing still, you mainly get a tighter view of the same perspective.
This matters when a generated reference says “85 mm product photo.” That phrase describes a photographic convention, but it does not fully specify the scene. A bottle close to a wall and a bottle several meters in front of that wall need different instructions. Naming the camera distance, background spacing, and intended framing makes your brief less ambiguous.
See the difference with two equal-height objects
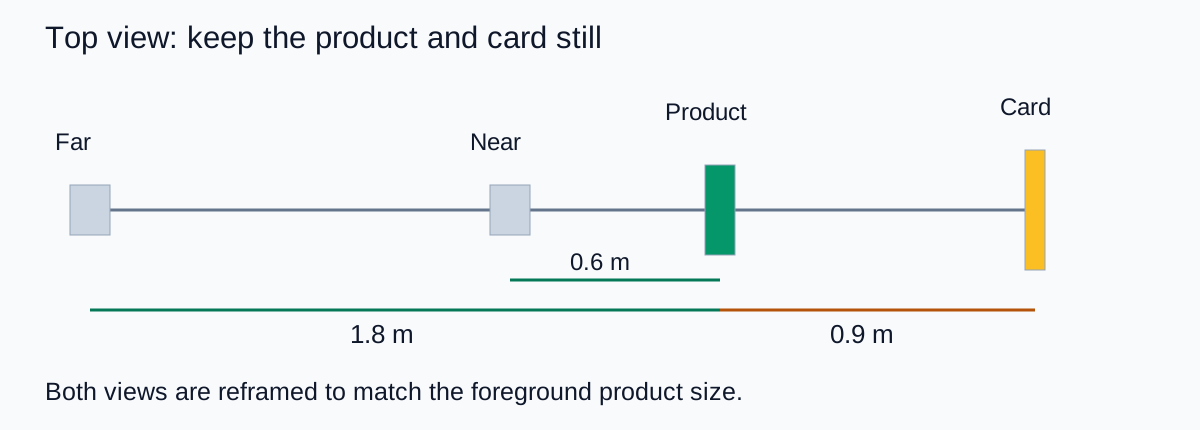
The diagram below uses an original, simplified pinhole-camera model. Imagine a 16 cm product and a 16 cm background card, with the card 0.9 m behind the product. We keep the foreground product at the same displayed height in both views. The drawing shows projected size, not blur or the measured performance of a real lens.
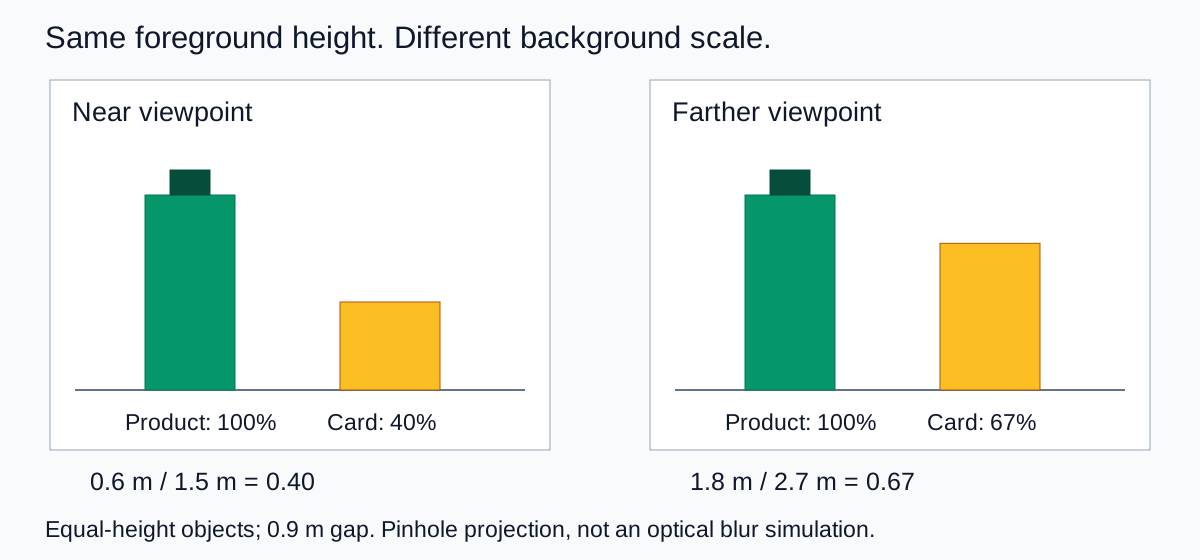
| Setup | Camera to product | Camera to card | Card height relative to product |
|---|---|---|---|
| Near viewpoint | 0.6 m | 1.5 m | 40% |
| Farther viewpoint | 1.8 m | 2.7 m | About 67% |
For equally tall objects in this simple model, the apparent background-to-subject height ratio is the camera-to-subject distance divided by the camera-to-background distance. The first calculation is 0.6 ÷ 1.5 = 0.40. The second is 1.8 ÷ 2.7, or roughly 0.67. Those are calculated examples, not promised measurements from a camera or AI model.
The card has not moved closer to the product. Its relative size has changed from the new viewpoint. Keeping the foreground framing constant makes that change easy to see. Download the distance experiment sheet if you want to substitute your own dimensions.
Repeat the experiment before planning a shoot
Use a plain bottle or small box and a background card of similar height. Avoid reflective packaging for the first attempt so that changing highlights do not distract from the size relationship. Place both on stable supports and mark their positions.
- Choose a clear reference edge. A colored card, narrow doorway, or vertical strip behind the product gives you something easy to compare. Keep it visible beside the subject rather than completely hidden.
- Take the near view. Frame the entire product with a little space around it. Keep the camera level and note the distance from the camera to the product.
- Move straight backward. Keep the camera height and direction as consistent as you can. Leave the product and background where they were.
- Restore the product's size. Use an appropriate camera lens or zoom setting. You can also crop the farther image for this learning exercise, although a strong crop reduces the available pixels.
- Compare at the same display size. Match the top and bottom of the foreground product, then look at the background card's height. Do not compare two previews that are independently fitted to different windows.
- Record the setup you would repeat. Keep distance notes and the original files. A camera position you can reconstruct is more useful than remembering that one version looked “more cinematic.”
On a phone, a zoom button may switch lenses, crop the sensor image, or combine computational processing. You do not need to settle all of those details to observe perspective. The decisive check is whether you physically moved the camera and then matched the product framing. Keep the unedited originals so that a later crop does not hide what changed.
Choose the background relationship for the job
For a product shown in a recognizable setting, I would usually test a farther viewpoint first. A cafe shelf, architectural detail, or repeating row of plants can become more prominent without making the product smaller in the finished frame. That can help a lifestyle photograph communicate its location.
For a small product that should feel separate from a busy space, moving closer may give you more apparent separation. Watch the product itself while doing this. A close viewpoint can exaggerate differences between its near and far surfaces, which may be undesirable for packaging that needs a faithful silhouette.
Neither choice is automatically more professional. A narrow bottle can look elegant against stacked arches, while a catalog photograph may need a quieter, more neutral background. For a label-sensitive campaign, preserve the packaging checks in the skincare product photography guide instead of choosing a composition only because the scenery is attractive.
Describe the relationship in an AI image brief
For an AI-assisted concept, I would describe the visible result rather than treating a focal length as a guaranteed optical setting. Use the generated frame to discuss composition, then check whether the real product, its proportions, and the background remain credible.
Use the supplied product image as the reference. Keep the full bottle upright, with its silhouette and approved label unchanged. Compose from a relatively distant viewpoint with tight framing on the product. The repeated architectural forms behind it should appear closely layered and substantial in scale. Keep the product clearly separated from the background through lighting and placement. Do not change the packaging to make the composition fit.
The distinction is useful even if a model does not simulate a real lens. You have specified foreground size, background prominence, and product preservation as separate review criteria. If the first result merely crops closer, revise the background relationship. If it changes the bottle shape, reject that change rather than calling it a successful perspective effect.
You can explore that composition in QuestStudio Image Lab. My recommendation is to save one approved product reference, change one part of the scene brief at a time, and compare the result against the original. A generated image remains a visual concept; the numerical diagram above is a separate geometric exercise.
Check three things before using the image
First, compare the product's proportions. Second, check whether background objects have a coherent scale and position. Third, review the intended crop, including room for any headline or price that will be added later. A composition that looks good full-width may lose its depth cues in a narrow social crop.
If the background feels crowded, moving farther away again is not necessarily the answer. Change the background, its spacing, or the framing. Perspective is one control among several. I would keep the version that explains the product most clearly, even when the less compressed image looks less dramatic in isolation.
Frequently asked questions
Does a longer focal length cause lens compression?
The perspective relationship comes from camera position. A longer focal length often accompanies a farther viewpoint because it helps keep the subject large in the frame. Zooming from the same position does not create that viewpoint change.
Can I demonstrate lens compression with a phone?
Yes. Move the phone farther from a fixed subject and background, then match the subject framing with an appropriate zoom setting or a crop. Keep the originals and remember that cropping reduces usable image resolution.
Does a smaller camera sensor change perspective?
Changing the sensor crop from the same camera position changes the field of view, not the physical viewpoint. Perspective changes when you move the camera to restore the framing.
Is background compression the same as background blur?
No. Compression describes the relative scale and apparent spacing of objects. Blur describes how out-of-focus details are rendered. Judge those properties separately when choosing a photograph.
Will adding a lens focal length to an AI prompt reproduce the calculation?
No. A generated image is not evidence that a model used a specific lens or distance. Describe the intended composition and inspect the result; use the geometric exercise for understanding the relationship.
Technical references
Continue with a useful next step
 Image
AI Sunglasses Photos: Keep Frames and Lens Tint Clear
Create supporting sunglasses product photos with AI. Preserve frame geometry and lens tint, compare paired details and keep optical claims outside image review.
 Image
Product Photography Lighting: A Tabletop Setup Plan
Plan a tabletop product photography lighting setup with a soft source and bounce card. Review reflections, keep a test log and change one variable at a time.
 Image
AI Exploded View: Show Product Parts Without Inventing Them
Create a useful exploded-view product image from a verified part inventory, with clear spacing, plausible order, and a separate check for technical claims.
Hero: AI-generated editorial illustration. Supporting diagrams and exercises: QuestStudio.